
ALPHA 6400 - Camera SONY - Free user manual and instructions
Find the device manual for free ALPHA 6400 SONY in PDF.
| Product type | Interchangeable-lens digital camera |
| Brand | Sony |
| Model | Alpha 6400 (ILCE-6400) |
| Lens mount | Sony E-mount |
| Image sensor | APS-C CMOS (23.5 × 15.6 mm) |
| Effective pixels | Approx. 24.2 megapixels |
| ISO sensitivity (still images) | ISO 100 – 32,000 (expandable to 50 – 102,400) |
| Shutter speed | 1/4000 s to 30 s, bulb |
| Viewfinder | Electronic, 0.39 type, 2,359,296 dots |
| Screen | 7.5 cm (3.0 type) LCD touch screen, 921,600 dots, tilting |
| Image stabilization | None (lens stabilization for certain lenses) |
| Video recording | 4K (3840×2160) up to 30p, Full HD up to 120p |
| Recording formats | JPEG, RAW (ARW 2.3), XAVC S, AVCHD |
| Storage media | SD/SDHC/SDXC (UHS-I), Memory Stick PRO Duo (via adapter) |
| Connectivity | Wi-Fi 802.11 b/g/n, Bluetooth 4.1, NFC, USB Type-C (USB 2.0), micro HDMI |
| Power source | NP-FW50 battery (7.2 V, 1020 mAh) |
| Dimensions (W × H × D) | 120.0 × 66.9 × 59.7 mm (excluding protrusions) |
| Weight | Approx. 403 g (with battery and memory card) |
| Sensor cleaning | Anti-dust system by vibrations of the optical filter unit |
| Security | AF lock, red-eye reduction, password protection (Wi-Fi) |
| Spare parts and repairability | Battery, charger, USB cable, carrying case available as options; repair by authorized Sony service center |
Frequently Asked Questions - ALPHA 6400 SONY
User questions about ALPHA 6400 SONY
0 question about this device. Answer the ones you know or ask your own.
Ask a new question about this device
Download the instructions for your Camera in PDF format for free! Find your manual ALPHA 6400 - SONY and take your electronic device back in hand. On this page are published all the documents necessary for the use of your device. ALPHA 6400 by SONY.
USER MANUAL ALPHA 6400 SONY
7_ Ⅲ
E-mount

"Help Guide" (Web manual)
Refer to "Help Guide" for
in-depth instructions on the
many functions of the camera.
The "Help Guide" is an on-line manual that you can read on your computer or smartphone. Refer to it for details on menu items, advanced usage, and the latest information on the camera.

Scan here
http://rd1.sony.net/help/ilc/1720/h_zz/
ILCE-7M3 Help Guide

Instruction Manual (this book)

This manual introduces some basic functions.
For the quick start guide, see "Startup guide" (page 22). The "Startup guide" introduces the initial procedures from when you open the package until you release the shutter for the first shot.
In-Camera Guide

The [In-Camera Guide] shows explanations of the menu items on the monitor of the camera.
You can quickly pull up information during shooting.
To use the [In-Camera Guide] function, some settings must be made beforehand. For details, search "In-Camera Guide" in the Help Guide.
Notes on using your camera
Along with this section, also see "Precautions" in the Help Guide (page 2).
Screen language
You can select the language displayed on the screen using the menu (page 70).
Notes on handling the product
- This camera is designed to be dust- and moisture-resistant, but is not waterproof or dust-proof.
- When using the power zoom lens, be careful not to get your fingers or any other objects caught in the lens.
- Always attach the lens front cap or body cap when you are not using the camera. To prevent dust or debris from getting inside the camera, remove dust from the body cap before attaching it to the camera.
-
Do not leave the lens or the viewfinder exposed to a strong light source such as sunlight. Because of the lens's condensing function, doing so may cause smoke, fire, or a malfunction inside the camera body or the lens. If you have to leave the camera exposed to a light source such as sunlight, attach the lens cap to the lens.
-
When you shoot with backlighting, keep the sun sufficiently far away from the angle of view. Otherwise, the sunlight may enter the focus inside the camera and cause smoke or fire. Even if the sun is slightly away from the angle of view, it may still cause smoke or fire.
- Do not directly expose the lens to beams such as laser beams. That may damage the image sensor and cause the camera to malfunction.
- Do not look at sunlight or a strong light source through the lens when it is detached. This may result in unrecoverable damage to the eyes or cause a malfunction.
- Do not leave the camera, the supplied accessories, or memory cards within the reach of infants. They may be accidentally swallowed. If this occurs, consult a doctor immediately.
Notes on the monitor and electronic viewfinder
-
The monitor and electronic viewfinder are manufactured using extremely high-precision technology, and over 99.99% of the pixels are operational for effective use. However, there may be some small black dots and/or bright dots (white, red, blue or green in color) that constantly appear on the monitor and electronic viewfinder. These are imperfections due to the manufacturing process and do not affect the recorded images in any way.
-
The image may be slightly distorted near the corners of the viewfinder. This is not a malfunction. When you want to see the full composition with all its details, you can also use the monitor.
- If you pan the camera while looking into the viewfinder or move your eyes around, the image in the viewfinder may be distorted or the color of the image may change. This is a characteristic of the lens or display device and is not a malfunction. When you shoot an image, we recommend that you look at the center area of the viewfinder.
- When shooting with the viewfinder, you may experience symptoms such as eyestrain, fatigue, travel sickness, or nausea. We recommend that you take a break at regular intervals when you are shooting with the viewfinder. In case you may feel uncomfortable, refrain from using the viewfinder until your condition recovers, and consult your doctor as necessary.
- If the monitor or electronic viewfinder is damaged, stop using the camera immediately. The damaged parts may harm your hands, face, etc.
Notes on continuous shooting
During continuous shooting, the monitor or viewfinder may flash between the shooting screen and a black screen. If you keep watching the screen in this situation, you may experience uncomfortable symptoms such as feeling of unwellness. If you experience uncomfortable symptoms, stop using the camera, and consult your doctor as necessary.
Notes on recording for long periods of time or recording 4K movies
Depending on the camera and battery temperature, you may be unable to record movies or the power may turn off automatically to protect the camera. A message will be displayed on the screen before the power turns off or you can no longer record movies. In this case, leave the power off and wait until the camera and battery temperature goes down. If you turn on the power without letting the camera and battery cool enough, the power may turn off again or you may be unable to record movies.
- When the temperature of the camera rises, the image quality may deteriorate. It is recommended that you wait until the temperature of the camera drops before continuing to shoot.
- Under high ambient temperatures, the temperature of the camera rises quickly.
- Camera body and battery may get warm with use - this is normal.
- If the same part of your skin touches the camera for a long period of time while using the camera, even if the camera does not feel hot to you, it may cause symptoms of a low-temperature burn such as redness or blistering. Pay special attention in the following situations and use a tripod, etc.
- When using the camera in a high-temperature environment
- When someone with poor circulation or impaired skin sensation uses the camera
- When using the camera with the Auto Pwr OFF Temp. set to [High].
- Especially during 4K movie shooting, the recording time may be shorter under low temperature conditions. Warm up the battery pack or replace it with a new battery.
Notes on recording/playback
Before you start recording, make a trial recording to make sure that the camera is working correctly.
- The recorded image may be different from the image you monitored before recording.
- Do not use the camera in areas where strong radio waves or radiation are being emitted. Recording and playback may not function correctly.
- Playback of images recorded with your product on other equipment and playback of images recorded or edited with other equipment on your product are not guaranteed.
- Sony can provide no guarantees in the event of failure to record or loss or damage of recorded images or audio data due to a malfunction of the camera or recording media, etc. We recommend backing up important data.
- Once you format the memory card, all the data recorded on the memory card will be deleted and cannot be restored. Before formatting, copy the data to a computer or other device.
Notes on the Multi Interface Shoe
- When attaching or detaching accessories such as an external flash to the Multi Interface Shoe, first turn the power to OFF. When attaching the accessory, confirm that it is firmly fastened to the camera.
- Do not use the Multi Interface Shoe with a commercially available flash that applies voltages of 250V or more or has the opposite polarity of the camera. It may cause a malfunction.
Sony lenses/accessories
Using this unit with products from other manufacturers may affect its performance, leading to accidents or malfunction.
On the data specifications described in this manual
The data on performance and specifications are defined under the following conditions, except as described in this manual: at an ordinary ambient temperature of 25^ (77^) , and using a battery pack that has been fully charged until the charge lamp has turned off.
Warning on copyright
Television programs, films, videotapes, and other materials may be copyrighted. Unauthorized recording of such materials may be contrary to the provisions of the copyright laws.
Notes on location information
If you upload and share an image tagged with a location, you may accidentally reveal the information to a third party. To prevent third parties from obtaining your location information, set [Loc. Info. Link Set.] to [Off] before shooting images.
Notes on discarding or transferring this product to others
When discarding or transferring this product to others, make sure to perform the following operation to protect private information.
- Select [Setting Reset] [Initialize].
Notes on discarding or transferring a memory card to others
Executing [Format] or [Delete] on the camera or a computer may not completely delete the data on the memory card. When transferring a memory card to others, we recommend that you delete the data completely using data deletion software. When discarding a memory card, we recommend that you physically destroy it.
Notes on wireless LAN
If your camera is lost or stolen, Sony bears no responsibility for the loss or damage caused by illegal access or use of the registered access point on the camera.
Notes on security when using wireless LAN products
Always make sure that you are using a secure wireless LAN to avoid hacking, access by malicious third parties, or other vulnerabilities.
- It is important that you set the security settings when using a wireless LAN.
- If a security problem arises because no security precautions are in place or due to any inevitable circumstances when using a wireless LAN, Sony bears no responsibility for the loss or damage.
How to turn off wireless network functions (Wi-Fi, etc.) temporarily
When you board an airplane, etc., you can turn off all wireless network functions temporarily using [Airplane Mode].
Power Cord
For the customers in the UK, Ireland, Malta, Cyprus and Saudi Arabia Use the power cord (A). For safety reasons, the power cord (B) is not intended for above countries/regions and shall therefore not be used there. For the customers in other EU countries/regions Use the power cord (B).
(A)
(B)
For Customers in the U.S.A.
For question regarding your product or for the Sony Service Center nearest you, call 1-800-222-SONY (7669).
Declaration of Conformity
Trade Name:SONY
Model No.:WW541200
Responsible Party: Sony Electronics Inc.
Address: 16535 Via Esprillo, San Diego, CA 92127 U.S.A.
Telephone Number: 858-942-2230
This device complies with part 15 of the FCC rules. Operation is subject to the following two conditions: (1) This device may not cause harmful interference, and (2) this device must accept any interference received, including interference that may cause undesired operation.
Notes on this manual
This manual covers several models supplied with different lenses.
The model name varies depending on the supplied lens. The available model varies depending on the countries/regions.
| Model name | Lens |
| ILCE-7M3 | Not supplied |
| ILCE-7M3K | FE 28-70 mm F3.5-5.6 OSS |
For details on the Wi-Fi functions and NFC One-touch functions, refer to the "Help Guide" (page 2).
Checking the camera and the supplied items
First check the model name of your camera (page 7).
The accessories supplied differ depending on the model.
The number in parentheses indicates the number of pieces.
Supplied with all models
- Camera (1)
- AC Adaptor (1)
The shape of the AC Adaptor may differ depending on the country/ region.
- Power cord (mains lead) (1)^* (supplied in some countries/ regions)

-
Multiple power cords may be supplied with your camera. Use the appropriate one that matches your country/region. See page 7.
-
Rechargeable battery pack NP-FZ100 (1)
- Micro USB cable (1)
Shoulder strap (1)

- Body cap (1) (Attached to the camera)

- Shoe cap (1) (Attached to the camera)
- Eyepiece cup (1) (Attached to the camera)
- Instruction Manual (1) (this manual)
Reference Guide (1)
ILCE-7M3K
- Zoom lens FE 28-70 mm F3.5-5.6 OSS (1) (including a front lens cap and a rear lens cap)
Lens hood (1)
Identifying parts
See the pages in parentheses for details.
Front side
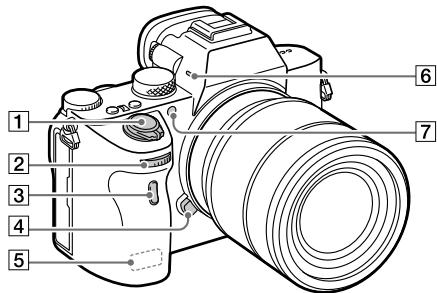
ON/OFF (Power) switch (28)/Shutter button (29)
2 Front dial You can quickly adjust the settings for each shooting mode.
3 Remote sensor
4 Lens release button (27)
5 Wi-Fi/Bluetooth antenna (built-in) (49)
6 Microphone Do not cover this part during movie recording. Doing so may cause noise or lower the volume.
AF illuminator (59)/Self-timer lamp

When the lens is removed
8 Mounting index (26)
9 Image sensor*
10 Mount
Lens contacts*
- Do not directly touch these parts.
Rear side
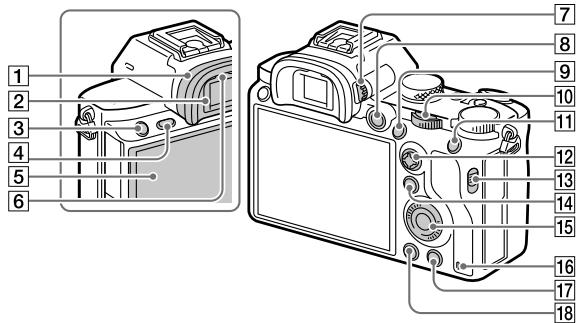
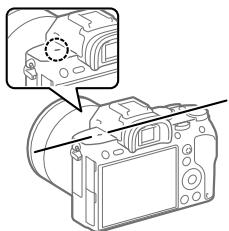
Eyepiece cup
To remove the eyepiece cup
Push the grips at the bottom of the eyepiece cup to the left and right and lift up the cup.
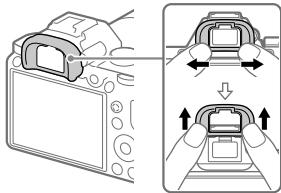
Remove the eyepiece cup when attaching an angle finder (sold separately).
Also, select MENU
2 (Camera Settings 2)
[FINDER/MONITOR], and then switch to [Viewfinder (Manual)] or [Monitor (Manual)].
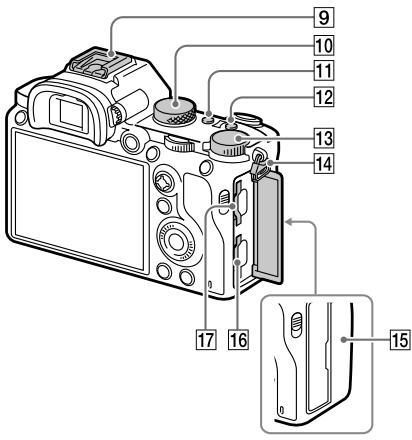
Viewfinder
C3 button (Custom button 3)
(65)/0- (Protect) button
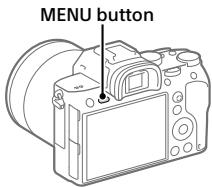
4 MENU button (56)
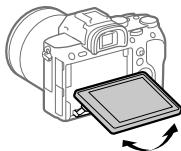
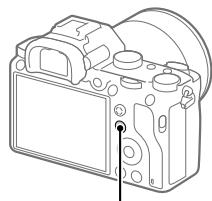
5 Monitor
(For touch operation: Touch panel/Touch pad) (40)
You can adjust the monitor to an easily viewable angle and shoot from any position.
6 Eye sensor
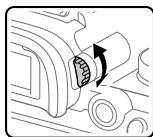
7 Diopter-adjustment dial Adjust the diopter-adjustment dial according to your eyesight until the display appears clearly in the viewfinder. If it is hard to operate the diopter-adjustment dial, remove the eyepiece cup before operating the dial.
MOVIE (Movie) button (30)
For shooting: AF-ON (AF On) button For viewing: (Enlarge Image) button
10 Rear dial You can quickly adjust the settings for each shooting mode.
For shooting: AEL button For viewing: (Image Index) button
12 Multi selector (18)
Media slot cover switch
For shooting: Fn (Function) button (18, 65) For viewing: (Send to Smartphone) button You can display the screen for [Send to Smartphone] by pressing this button.
15 Control wheel (17)
16 Access lamp
17 For shooting: C4 button (Custom button 4) (65) For viewing: (Delete) button (30)
18▶(Playback) button (30)
GB
Top side/Side view

1 Image sensor position mark
- The image sensor is the sensor that converts light into an electric signal. The mark shows the location of the image sensor. When you measure the exact distance between the camera and the subject, refer to the position of the horizontal line.
- If the subject is closer than the minimum shooting distance of the lens, the focus cannot be confirmed. Make sure you put enough distance between the subject and the camera.
2 Speaker
3 (Microphone) jack When an external microphone is connected, the built-in microphone turns off automatically. When the external microphone is a plugin-power type, the power of the microphone is supplied by the camera.
4 (Headphones) jack
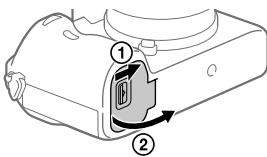
HDMI micro jack
USB Type-CTM terminal (14, 52)
Charge lamp
Multi/Micro USB Terminal (14, 52) This terminal supports Micro USB-compatible devices.
9 Multi Interface Shoe Some accessories may not go in all the way and protrude backward from the Multi interface shoe. However, when the accessory reaches the front end of the shoe, the connection is completed.
10 Mode dial (30)
C2 button (Custom button 2) (65)
C1 button (Custom button 1) (65)
Exposure compensation dial
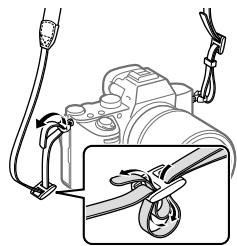
14 Hooks for shoulder strap Attach both ends of the strap onto the camera.
15 N (N mark) (49)
- This mark indicates the touch point for connecting the camera and an NFC-enabled Smartphone.
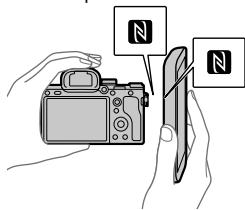
- NFC (Near Field Communication) is an international standard of short-range wireless communication technology.
16 SLOT 1 (Memory card slot 1) (24) Supports SD cards only (compatible with UHS-I and UHS-II)
17 SLOT 2 (Memory card slot 2) (25)
Supports SD cards (compatible with UHS-I) and Memory Stick PRO Duo media
- For details on compatible accessories for the multi interface shoe and the Multi/Micro USB Terminal, visit the Sony website, or consult your Sony dealer or local authorized Sony service facility. Accessories for the Accessory Shoe can also be used. Operations with other manufactures' accessories are not guaranteed.

Multi
Interface Shoe
Accessory Shoe
Notes on USB terminals
You can use either the USB Type-C terminal or the Multi/ Micro USB Terminal for supplying power, charging the battery, and USB communications. However, you cannot conduct these operations with both terminals simultaneously.
- The battery charging time does not change according to the terminal you use.
- You can use accessories for the Multi/Micro USB Terminal, such as a remote commander (sold separately), while supplying power or performing PC Remote shooting using the USB Type-C terminal.
GB
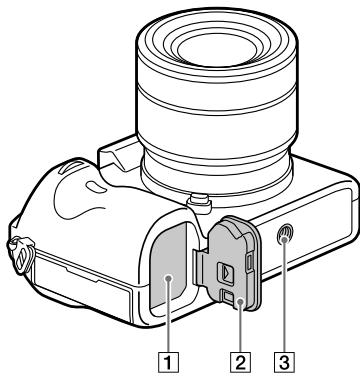
1 Battery insertion slot (22)
2 Battery cover (22)
3 Tripod socket hole
Use a tripod with a screw less than 5.5mm (7/32 inches) long. Otherwise, you cannot firmly secure the camera, and damage to the camera may occur.
4 Battery cover release lever
Lens FE 28-70 mm F3.5-5.6 OSS (Supplied with ILCE-7M3K)
1 Focusing ring
2 Zoom ring
3 Focal-length scale
4 Focal-length index
Lens contacts Do not touch this part directly.
6 Mount index
Basic operations
Using the control wheel
- You can select setting items by turning or pressing the top/bottom/left/right side of the control wheel. Your selection is determined when you press the center of the control wheel.
- The DISP (Display Setting), / (Drive Mode), and ISO (ISO) functions are assigned to the top/left/right side of the control wheel. In addition, you can assign selected functions to the left/right/bottom side and the center of the control wheel, and to the rotation of the control wheel.
- During playback, you can display the next/previous image by pressing the right/left side of the control wheel or by turning the control wheel.
GB
Using the multi selector
- Put your finger right on top of the multi selector to manipulate it more precisely.
- When [Focus Area] is set to [Zone], [Flexible Spot], or [Expand Flexible Spot], you can move the focus area by pressing the multi selector up/down/left/right.
- The [Focus Standard] function is assigned to the center of the multi-selector in the default settings.
Using the Fn (Function) button
You can register frequently used functions to the Fn (function) button and recall them while shooting. Up to 12 frequently used functions can be registered to the Fn (Function) button.
1 Press the DISP on the control wheel repeatedly to display a screen mode other than [For viewfinder], and then press the Fn (Function) button.
Fn button
2 Select the desired function by pressing the top/bottom/left/right side of the control wheel.
3 Select the desired setting by turning the front dial, and press the center of the control wheel.
- Some functions can be fine-tuned using the rear dial.

To adjust settings from the dedicated setting screens
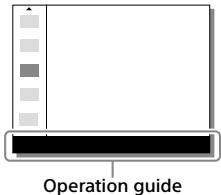
Select the desired function in step 2, then press the center of the control wheel. The dedicated setting screen for the function will appear. Follow the operating guide to adjust settings.
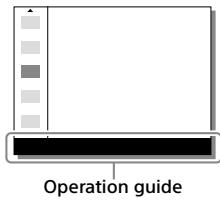
How to use the Quick Navi screen
The Quick Navi screen is a function optimized for shooting with the viewfinder, that lets you control settings directly.
1 Select MENU 2 (Camera Settings 2) [DISP Button] [Monitor].
2 Place a mark on [For viewfinder] and then select [Enter].
3 Press the DISP on the control wheel to set the screen mode to [For viewfinder].
4 Press the Fn button to switch to the Quick Navi screen.
- The displayed contents and their positions in the illustrations are just guidelines, and may differ from the actual displays.
Auto mode/Scene Selection mode
P/A/S/M mode
5 Select a function to set by pressing the top/bottom/left/right side of the control wheel.
6 Select the desired setting by turning the front dial.
- Some functions can be fine-tuned using the rear dial.
To adjust settings from the dedicated setting screens
Select the desired function in step 5, then press the center of the control wheel. The dedicated setting screen for the function will appear. Follow the operating guide to adjust settings.
Note
- Items that are gray on the Quick Navi screen are not adjustable.
- When using functions such as [Creative Style] or [Picture Profile], some settings can only be controlled from the dedicated screen.
GB
Startup guide
Step 1: Inserting the battery pack into the camera
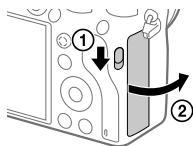
1 Open the battery cover.
2 Insert the battery pack while pressing the lock lever with the tip of the battery until the battery locks into place.
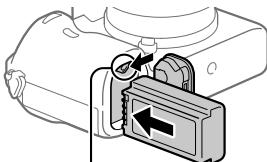
Lock lever
3 Close the cover.
To remove the battery pack
Make sure that the access lamp (page 11) is not lit, and turn off the camera. Then, slide the lock lever and remove the battery pack. Be careful not to drop the battery pack.
Lock lever
Step 2: Charging the battery pack while it is inserted in the camera
1 Turn the power off.
2 Connect the camera with the battery pack inserted to the AC Adaptor (supplied) using the USB cable, and connect the AC Adaptor to the wall outlet (wall socket).

Charge lamp on the camera (orange)
Lit: Charging
Off: Charging finished
Flashing: Charging error or charging paused temporarily because the camera is not within the proper temperature range
- Charging time (full charge): approximately 285 min (when charging a fully depleted battery pack at a temperature of 25^ ( 77^ )
- When you use a completely new battery pack or a battery pack that has not been used for a long time, the charge lamp may flash quickly when the battery is charged. If this happens, remove the battery pack or disconnect the USB cable from the camera and then re-insert it to recharge.
- Be sure to use only genuine Sony brand battery packs and AC Adaptors (supplied).
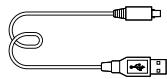
- Use the USB cable (supplied) or a USB-standard cable.
- The charging time will be the same if you use a USB Type-C cable.
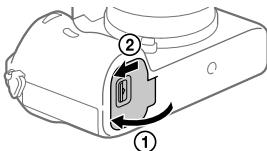
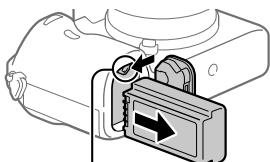
Step 3: Inserting a memory card
For details on memory cards that can be used with this camera, refer to page 81.
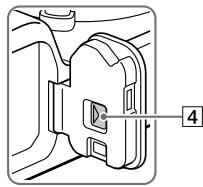
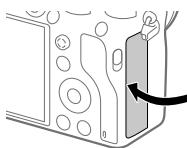
1 Open the memory card cover.
2 Insert the SD card into the slot 1.
Slot 1 (lower): Supports SD cards (compatible with UHS-I and UHS-II)
Slot 2 (upper): Supports SD cards (compatible with UHS-I) and Memory Stick PRO Duo media

Slot 2 Slot 1
- With the notched corner facing in the direction illustrated, insert the memory card until it clicks into place.
- You can change which memory card slot to use by selecting MENU → (Setup) → [Rec. Media Settings] → [Prioritize Rec. Media].
The slot 1 is used in the default settings.
- Use the slot 1 when you are only using one SD card.
- Use the slot 2 when you are using Memory Stick media. In this case, set [Prioritize Rec. Media] to [Slot 2].
3 Close the cover.
Hint
- When you use a memory card with the camera for the first time, it is recommended that you format the card on the camera for more stable performance of the memory card (page 71).
Note
- Do not insert a Memory Stick media into the slot 1. It may cause a malfunction.
To remove the memory card
Open the memory card cover.
Make sure that the access lamp (page 11) is not lit, and then push in the memory card once to remove it.

Access lamp
GB
To record to memory cards in two slots
The slot 1 is used in the default settings. If you do not intend to change the settings and will only use one memory card, use the slot 1.
By inserting another memory card into the slot 2, you can record the same images to two memory cards simultaneously or record a different type of image (still images/movies) to each memory card ([Recording Mode] under [Rec. Media Settings]) (page 71).
Step 4: Attaching a lens
1 Remove the body cap from the camera and the rear lens cap from the rear of the lens.
- When changing the lens, work quickly in a dust-free environment to keep dust or debris from getting inside the camera.
- It is recommended that you attach the front lens cap when you have done shooting.
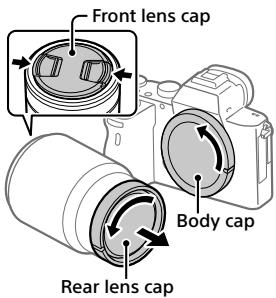
2 Mount the lens by aligning the two white index marks (mounting indexes) on the lens and camera.
- Hold the camera with the lens facing down to prevent dust or debris from entering the camera.

3 While pushing the lens lightly toward the camera, turn the lens slowly in the direction of the arrow until it clicks into the locked position.
Note
- Be sure to hold the lens straight and do not use force when attaching a lens.
- Do not press the lens release button when attaching a lens.
- The Mount Adaptor (sold separately) is required to use an A-mount lens (sold separately). For details, refer to the operating manual supplied with the Mount Adaptor.
- If you want to shoot full-frame images, use a full-frame size compatible lens.
- When carrying the camera with a lens attached, hold both the camera and the lens firmly.
- Do not hold the part of the lens that is extended for zoom or focus adjustment.
To remove the lens
Keep pressing the lens release button and turn the lens in the direction of the arrow until it stops.

Lens release button
Compatible lenses
Lenses compatible with this camera are as follows:
| Lens | Compatibility with the camera | |
| A-mount lens | Lens compatible with 35 mm full-frame format | ✓ (An optional Mount Adaptor (sold separately) compatible with full-frame format is required) |
| APS-C size dedicated lens | ✓* (An optional Mount Adaptor (sold separately) is required) | |
| E-mount lens | Lens compatible with 35 mm full-frame format | ✓ |
| APS-C size dedicated lens | ✓* | |
- Images will be recorded in APS-C size. The angle of view will correspond to approximately 1.5 times the focal length indicated on the lens. (For example, the angle of view will correspond to 75 mm when a 50 mm -lens is attached.)
Step 5: Setting the language and the clock
1 Set the ON/OFF (Power) switch to "ON" to turn on the camera.
ON/OFF (Power) switch
2 Select the desired language and then press the center of the control wheel.
Control wheel
3 Make sure that [Enter] is selected on the screen and then press the center.
4 Select the desired geographic location and then press the center.
5 Select [Date/Time] using the top/bottom of the control wheel or by turning the control wheel, and then press the center.
6 Select the desired item by pressing the top/bottom/left/right side of the control wheel, and then press the center.
7 Repeat steps 5 and 6 to set other items, then select [Enter] and press the center.
Hint
- To reset the date and time setting, use MENU (page 71).
Note
- This camera does not have a function for inserting the date into images. You can insert the date into images and then save and print them using PlayMemories Home (for Windows only).
Step 6: Shooting images in auto mode
GB

1 Turn the mode dial to set to AUTO.
The shooting mode will be set to i (Intelligent Auto).
2 Look into the viewfinder or the monitor and hold the camera.
3 Set the size of the subject by rotating the zoom ring of the lens when a zoom lens is attached.
4 Press the shutter button halfway down to focus.
- When the image is in focus, an indicator (such as ) will light up.
5 Press the shutter button all the way down.
To shoot movies
Press the MOVIE button to start/stop recording.
To play back images
Press the (Playback) button to play back images. You can select the desired image using the control wheel.
To delete displayed image
Press the (Delete) button while an image is displayed to delete it. Select [Delete] using the control wheel on the confirmation screen, and then press the center of the control wheel to delete the image.
To shoot images in various shooting modes
Set the mode dial to the desired mode depending on the subject or the functions you want to use.
Focusing
Focus Mode
Selects the focus method to suit the movement of the subject.
MENU 1(Camera Settings 1) [Focus Mode] desired setting.
AF-S (Single-shot AF): The product locks the focus once focusing is complete. Use this when the subject is motionless.
AF-A (Automatic AF): [Single-shot AF] and [Continuous AF] are switched according to the movement of the subject. When the shutter button is pressed halfway down, the product locks the focus when it determines that the subject is motionless, or continues to focus when the subject is in motion. During continuous shooting, the product automatically shoots with Continuous AF from the second shot.
AF-C (Continuous AF): The product continues to focus while the shutter button is pressed and held halfway down. Use this when the subject is in motion. In [Continuous AF] mode, there is no beep when the camera focuses.
DMF (DMF): You can make fine adjustments manually after performing auto focusing, letting you focus on a subject more quickly than when using the manual focus from the beginning. This is convenient in situations such as macro shooting.
MF (Manual Focus): Adjusts the focus manually. If you cannot focus on the intended subject using auto focus, use manual focus.
Focus indicator
- (lit): The subject is in focus and the focus is locked.
- (flashing): The subject is not in focus.
(lit): The subject is in focus. The focus will be adjusted continuously according to the movements of the subject.
(2) (lit): Focusing is in progress.
Subjects on which it is difficult to focus using auto focus
- Dark and distant subjects
- Subjects with poor contrast
- Subjects seen through glass
- Fast-moving subjects
- Reflective light or shiny surfaces
- Flashing light
- Back-lit subjects
- Continuously repetitive patterns, such as the facades of buildings
- Subjects in the focusing area with different focal distances
Hint
- In [Continuous AF] mode, you can lock the focus by pressing and holding the button that has been assigned the [Focus Hold] function (page 65).
- When you set the focus to infinity in the manual focus mode or the direct manual focus mode, make sure that the focus is on a sufficiently distant subject by checking the monitor or the viewfinder.
Note
- [Automatic AF] is available only when you are using a lens that supports phase detection AF.
- When [Continuous AF] or [Automatic AF] is set, the angle of view may change little by little while focusing. This does not affect the actual recorded images.
- Only [Continuous AF] and [Manual Focus] are available when shooting movies or when the mode dial is set to S&Q.
Auto focus
Focus Area
Selects the focusing area. Use this function when it is difficult to focus properly in the auto focus mode.
MENU 1(Camera Settings 1) [Focus Area] desired setting.
Wide: Focuses on a subject covering the whole range of the screen automatically. When you press the shutter button halfway down in the still image shooting mode, a green frame is displayed around the area that is in focus.
Zone: Select a zone on the monitor on which to focus, and the product will automatically select a focus area.
Center: Focuses automatically on a subject in the center of the image. Use together with the focus-lock function to create the composition you want.
Flexible Spot: Allows you to move the focusing frame to a desired point on the screen and focus on an extremely small subject in a narrow area.
Expand Flexible Spot: If the product cannot focus on a single selected point, it uses focus points around the flexible spot as a secondary priority area for focusing.
Lock-on AF: When the shutter button is pressed and held halfway down, the product tracks the subject within the selected autofocus area. This setting is available only when the [Focus Mode] is set to [Continuous AF]. Point the cursor at [Lock-on AF] on the [Focus Area] setting screen, and then adjust the desired area to start tracking using the left/right sides of the control wheel. You can also move the tracking start area to the desired point by designating the area as a zone, flexible spot or expand flexible spot.
Examples of the focusing frame display
The focusing frame differs as follows.
When focusing on a larger area
When focusing on a smaller area
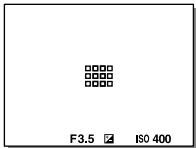
- When [Focus Area] is set to [Wide] or [Zone], the focusing frame may switch between "When focusing on a larger area" and "When focusing on a smaller area" depending on the subject or situation.
- When you attach an A-mount lens with a Mount Adaptor (LA-EA1 or LA-EA3) (sold separately) and [AF System] is set to [Phase Detection AF], the focusing frame for "When focusing on a smaller area" may be displayed.
When focus is achieved automatically based on the whole range of the monitor
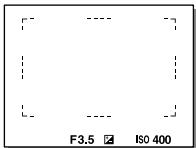
- When you use a zoom function other than the optical zoom, the [Focus Area] setting is disabled and the focusing frame is shown by the dotted line. The AF operates with priority on and around the center area.
To move the focus area
- You can move the focus area in [Flexible Spot], [Expand Flexible Spot], or [Zone] by operating the multi selector. If you assign [Focus Standard] to the center of the multi selector beforehand, you can move the focusing frame back to the center of the monitor by pressing the center of the multi selector.
- You can move the focusing frame quickly by touching and dragging it on the monitor. Set [Touch Operation] to [On] beforehand (page 40).
Hint
- In the default settings, [Focus Area] is assigned to the C2 button.
Note
-
[Focus Area] is locked to [Wide] in the following situations:
-
[Intelligent Auto]
-
[Scene Selection]
-
The focus area may not light up during continuous shooting or when the shutter button is pressed all the way down at once.
- When the mode dial is set to H (Movie) or S&Q, or during movie shooting, [Lock-on AF] cannot be selected as the [Focus Area].
Manual Focus
When it is difficult to focus properly in the autofocus mode, you can adjust the focus manually.
1 MENU 1(Camera Settings 1) [Focus Mode] [Manual Focus].
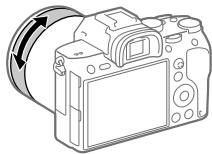
2 Rotate the focusing ring to achieve sharp focus.
- When you rotate the focusing ring, the focus distance is displayed on the screen. The focus distance is not displayed when the Mount Adaptor (sold separately) is attached.
3 Press the shutter button fully down to shoot an image.
Note
- When you use the viewfinder, adjust the diopter level to obtain the correct focus on the viewfinder (page 11).
Direct manual focus (DMF)
You can make fine adjustments manually after performing auto focusing, letting you focus on a subject more quickly than when using the manual focus from the beginning. This is convenient in situations such as macro shooting.
1 MENU 1(Camera Settings 1) [Focus Mode] [DMF].
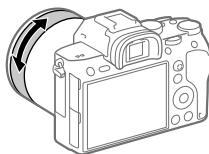
2 Press the shutter button halfway down to focus automatically.
3 Keep the shutter button pressed halfway down, and then rotate the focusing ring to achieve a sharper focus.
- When you rotate the focusing ring, the focus distance is displayed on the screen. The focus distance is not displayed when the Mount Adaptor (sold separately) is attached.
4 Press the shutter button fully down to shoot an image.
Continuous shooting
Shoots images continuously while you press and hold down the shutter button.
1 Select / (Drive Mode) on the control wheel [Cont. Shooting].
- You can also set the drive mode by selecting MENU
1 Camera Settings 1) [Drive Mode].
2 Select the desired mode using the right/left side of the control wheel.
Continuous Shooting: Hi+: Images are shot continuously at the maximum speed while you press and hold down the shutter button.
Hi Continuous Shooting: Hi / MD Continuous Shooting: Mid / Lo Continuous Shooting: Lo: Subjects are easier to track because the subject is displayed in real-time on the monitor or viewfinder during shooting.
Hint
- To continuously adjust the focus and exposure during continuous shooting, set as follows:
- [Focus Mode]: [Continuous AF]
- [AEL w/shutter]: [Off] or [Auto]
Note
- The shooting speed during continuous shooting becomes slower when [RAW File Type] is set to [Uncompressed].
- The shooting speed during continuous shooting becomes slower when [e-Front Curtain Shut.] is set to [Off] in [Continuous Shooting: Hi], [Continuous Shooting: Mid] or [Continuous Shooting: Lo] mode.
- When the F-value is greater than F11 in [Continuous Shooting: Hi+], [Continuous Shooting: Hi] or [Continuous Shooting: Mid] mode, the focus is locked to the setting in the first shot.
- The subject is not displayed in real-time on the monitor or viewfinder when shooting in [Continuous Shooting: Hi+] mode.
- Continuous shooting is unavailable in the following situations:
- The shooting mode is set to [Scene Selection] and a scene other than [Sports Action] is selected.
- [Picture Effect] is set to [Rich-tone Mono.].
- [DRO/Auto HDR] is set to [Auto HDR].
Displaying continuous shooting remaining time indicator (Cont. Shoot. Length)
Sets whether to display an indicator of the remaining time for which continuous shooting can be performed at the same shooting speed.
MENU 2 (Camera Settings 2) [Cont.Shoot.Length] desired setting.
Always Display: Always displays the indicator when the drive mode is set to [Cont. Shooting].
![SONY ALPHA 6400 - MENU 2 (Camera Settings 2) [Cont.Shoot.Length] desired setting. - 1](/content/2024/11/202388/images/2749fb5b3ec119af459780c1fa4af74e819676525103b45c4cb276dd0b2ca052.jpg)
Shoot.-Only Display: Displays the indicator only while continuous shooting is performed.
Not Displayed: Does not display the indicator.
Hint
- When the internal camera memory for buffering is full, "SLOW" will be displayed and the continuous shooting speed will decrease.
Using touch function
Touch Operation
Sets whether to activate or not the touch operation of the monitor.
Touch operations when shooting with the monitor are referred to as "touch panel operations," and touch operations when shooting with the viewfinder are referred to as "touch pad operations."
MENU (Setup) [Touch Operation] desired setting.
On: Activates the touch operation.
Off: Deactivates the touch operation.
Touch Panel/Pad
Selects whether to activate touch panel operation when shooting with the monitor, or touch pad operation when shooting with the viewfinder.
MENU (Setup) [Touch Panel/Pad] desired setting.
Touch Panel+Pad: Activates both the touch panel operations when shooting with the monitor and touch pad operations when shooting with the viewfinder.
Touch Panel Only: Activates only the touch panel operations when shooting with the monitor.
Touch Pad Only: Activates only the touch pad operations when shooting with the viewfinder.
Touch Focus
You can select a subject on which to focus using touch operations in the still image and movie recording modes.
MENU (Setup) [Touch Operation] [On].
- Specifying the position where you want to focus in the still image mode
You can focus on the desired position by touching the monitor.
① Select a [Focus Area] other than [Flexible Spot] or [Expand Flexible Spot].
② MENU 1 (Camera Settings 1) [Center Lock-on AF] [Off].
③ Touch the monitor.
- When shooting with the monitor, touch the subject to focus.
- When shooting with the viewfinder, you can move the position of the focus by touching and dragging on the monitor while looking through the viewfinder.

- When the shutter button is pressed halfway down, the camera focuses on the focusing frame. Press the shutter button all the way down to shoot images.
- To cancel focusing with touch operations, touch or press the center of the control wheel if shooting with the monitor, and press the center of the control wheel if shooting with the viewfinder.
- Specifying the position where you want to focus in the movie recording mode (spot focus)
The camera will focus on the touched subject. Spot focus is not available when shooting with the viewfinder.
① Select a [Focus Area] other than [Flexible Spot] or [Expand Flexible Spot].
② MENU 1 (Camera Settings 1) [Center Lock-on AF] [Off].
③ Touch the subject on which you want to focus before or during recording.
- When you touch the subject, the focus mode temporarily switches to manual focus and the focus can be adjusted using the focus ring.
- To cancel spot focus, touch or press the center of the control wheel.
Hint
-
In addition to the touch focus function, touch operations such as the following are also available.
-
When [Focus Area] is set to [Flexible Spot] or [Expand Flexible Spot], the focusing frame can be moved using touch operations.
-
When the [Focus Mode] is set to [Manual Focus], the focus magnifier can be used by double-tapping the monitor.
Note
- The touch focus function is not available in the following situations:
- When [Focus Mode] is set to [Manual Focus].
- When using the digital zoom
- When using the LA-EA2 or LA-EA4
- When using the LA-EA1 or LA-EA3, and the shooting mode is set to [Movie]
Selecting a still image size/image quality
JPEG Image Size
The larger the image size, the more detail will be reproduced when the image is printed on large-format paper. The smaller the image size, the more images can be recorded.
MENU 1(Camera Settings 1) [JPEG Image Size] desired setting.
| When [Aspect Ratio] is set to 3:2 | |
| L: 24M | 6000×4000 pixels |
| M: 10M | 3936×2624 pixels |
| S: 6.0M | 3008×2000 pixels |
| When [Aspect Ratio] is set to 16:9 | |
| L: 20M | 6000×3376 pixels |
| M: 8.7M | 3936×2216 pixels |
| S: 5.1M | 3008×1688 pixels |
When recording in the APS-C-equivalent size
| When [Aspect Ratio] is set to 3:2 | |
| L: 10M | 3936×2624 pixels |
| M: 6.0M | 3008×2000 pixels |
| S: 2.6M | 1968×1312 pixels |
| When [Aspect Ratio] is set to 16:9 | |
| L: 8.7M | 3936×2216 pixels |
| M: 5.1M | 3008×1688 pixels |
| S: 2.2M | 1968×1112 pixels |
Note
- When [File Format] is set to [RAW] or [RAW & JPEG], the image size for RAW images corresponds to "L."
Selects the JPEG image quality when [File Format] is set to [RAW & JPEG] or [JPEG].
MENU 1(Camera Settings 1) [JPEG Quality] desired setting.
Extra fine/Fine/Standard: Since the compression rate increases from [Extra fine] to [Fine] to [Standard], the file size decreases in the same order. This allows more files to be recorded on one memory card, but the image quality is lower.

File Format
Sets the file format for still images.
MENU 1(Camera Settings 1) [File Format] desired setting.
RAW: Digital processing is not performed on this file format. Select this format to process images on a computer for professional purposes.
RAW & JPEG: A RAW image and a JPEG image are created at the same time. This is suitable when you need two image files, a JPEG for viewing, and a RAW for editing.
JPEG: The image is recorded in the JPEG format.
Changing settings for movie recording
File Format
Selects the movie file format.
MENU 2 (Camera Settings 2) [File Format] desired setting.
| File Format | Characteristics | |
| XAVC S 4K | Records movies in 4K resolution (3840×2160). | You can save movies on a computer using the PlayMemories Home software. |
| XAVC S HD | Records movies in crispier quality than AVCHD with larger amounts of data. | You can save movies on a computer using the PlayMemories Home software. |
| AVCHD | The AVCHD format has a high degree of compatibility with storage devices other than computers. | You can save movies on a computer or create a disc that supports this format using the PlayMemories Home software. |
For details on memory cards that can be used for these formats, refer to page 81.
GB
Note
- When [File Format] is set to [AVCHD], the file size of movies is limited to approx. 2 GB. If the movie file size reaches approx. 2 GB during recording, a new movie file will be created automatically.
- Images will not appear on the monitor of the camera if you record movies while the camera is connected to an HDMI device with [File Format] set to [XAVC S 4K].
Record Setting
Selects the frame rate and bit-rate for movie recording.
MENU 2 (Camera Settings 2) [Record Setting] desired setting.
- The higher the bit-rate, the higher the image quality.
- For estimates of the maximum recordable movie time with each recording setting, refer to page 84.
When [File Format] is set to [XAVCS4K]
| Record Setting | Bit-rate | Description |
| 30p 100M/25p 100M | Approx. 100 Mbps | Records movies in 3840×2160 (30p/25p). |
| 30p 60M/25p 60M | Approx. 60 Mbps | Records movies in 3840×2160 (30p/25p). |
| 24p 100M* | Approx. 100 Mbps | Records movies in 3840×2160 (24p). |
| 24p 60M* | Approx. 60 Mbps | Records movies in 3840×2160 (24p). |
- Only when [NTSC/PAL Selector] is set to NTSC
When [File Format] is set to [XAVC SHD]
| Record Setting | Bit-rate | Description |
| 60p 50M/50p 50M | Approx. 50 Mbps | Records movies in 1920×1080 (60p/50p). |
| 60p 25M/50p 25M | Approx. 25 Mbps | Records movies in 1920×1080 (60p/50p). |
| 30p 50M/25p 50M | Approx. 50 Mbps | Records movies in 1920×1080 (30p/25p). |
| 30p 16M/25p 16M | Approx. 16 Mbps | Records movies in 1920×1080 (30p/25p). |
| 24p 50M* | Approx. 50 Mbps | Records movies in 1920×1080 (24p). |
| 120p 100M/100p 100M | Approx. 100 Mbps | Records high-speed movies in 1920×1080 (120p/100p). You can record movies in 120 fps or 100 fps. • You can create smoother slow-motion movies by using compatible editing devices. |
| 120p 60M/100p 60M | Approx. 60 Mbps | Records high-speed movies in 1920×1080 (120p/100p). You can record movies in 120 fps or 100 fps. • You can create smoother slow-motion movies by using compatible editing devices. |
- Only when [NTSC/PAL Selector] is set to NTSC
When [File Format] is set to [AVCHD]
| Record Setting | Bit-rate | Description |
| 60i 24M (FX)/50i 24M (FX) | 24 Mbps at maximum | Records movies in 1920×1080 (60i/50i). |
| 60i 17M (FH)/50i 17M (FH) | Approx. 17 Mbps on average | Records movies in 1920×1080 (60i/50i). |
Note
- Creating an AVCHD recording disc from movies that were recorded with [60i 24M (FX)]/[50i 24M (FX)] as the [Record Setting] takes a long time because the image quality of movies is converted. If you want to store movies without converting them, use a Blu-ray Disc.
-
[120p] / [100p] cannot be selected for the following settings.
-
[Intelligent Auto]
-
[Scene Selection]
-
In full-frame shooting, the angle of view will be narrower under the following conditions:
-
When [File Format] is set to [XAVC S 4K] and [Record Setting] is set to [30p]
Using the Wi-Fi/One-touch (NFC)/Bluetooth functions
You can perform the following operations using the camera's Wi-Fi, NFC One-touch, and Bluetooth functions.
- Saving images to a computer
- Transferring images from the camera to a smartphone
- Using a smartphone as a remote control for the camera
Viewing still images on a TV - Recording location information from a smartphone to images
- Transferring images to the FTP server
For details, refer to the "Help Guide" (page 2).
GB
Installing PlayMemories Mobile
PlayMemories Mobile is required to connect the camera and a smartphone. If PlayMemories Mobile is already installed on your smartphone, be sure to update it to the latest version.
For details on PlayMemories Mobile, refer to the support page (http://www.sony.net/pmm/).

PlayMemories
Mobile

Note
- To use the camera's NFC One-touch function, an NFC-enabled Android smartphone or tablet is required.
- The Wi-Fi functions introduced in this manual are not guaranteed to operate on all smartphones or tablets.
- The Wi-Fi functions of this camera are not available when connected to a public wireless LAN.
- Depending on future version upgrades, the operational procedures or screen displays are subject to change without notice.
Recording location information to captured images
By using PlayMemories Mobile, you can obtain location information from a connected smartphone (via Bluetooth communication) and record it to captured images.
Transferring images to the FTP server
You can use the camera's Wi-Fi function to transfer images to the FTP server.
For details, refer to the "FTP Help Guide."
http://rd1.sony.net/help/di/ftp/h_zz/

- Basic knowledge of FTP servers is required.
Connecting the camera to a wireless access point
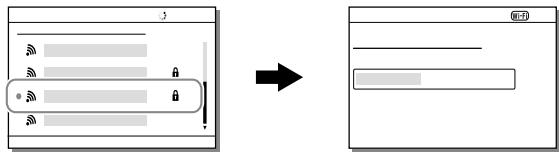
Connect the camera to your wireless access point. Before starting the procedure, make sure you have the SSID (name of the access point) and password of your wireless access point with you.
1 MENU (Network) [Wi-Fi Settings] [Access Point Set.].
2 Use the control wheel to select the access point to which you want to connect. Press the center of the control wheel and enter the password for the wireless access point, then select [OK].
Note
- If a connection is not established, see the wireless access point operating instructions or contact the administrator of the access point. To save images to a computer, install PlayMemories Home on your computer.
PlayMemories Home
http://www.sony.net/pm/
Connecting the camera to a computer
Connecting to a computer
1 Insert a sufficiently charged battery pack into the camera.
2 Turn on the camera and the computer.
3 Check that [USB Connection] under (Setup) is set to [Mass Storage].
4 Connect the camera to the computer using the USB cable.
- When you connect the camera to the computer for the first time, the procedure for recognizing the camera may start automatically on the computer. Wait until the procedure is finished.
- If you connect the camera to your computer using the USB cable when [USB Power Supply] is set to [On], power is supplied from your computer. (Default setting: [On])
- Use a USB 3.1-compatible computer and the USB Type-C cable (sold separately) for higher-speed communications.

Disconnecting the camera from the computer
Perform steps 1 and 2 below before performing the following operations:
- Disconnecting the USB cable.
- Removing a memory card.
- Turning off the product.
1 Click (Safely Remove Hardware and Eject Media) in the taskbar.
2 Click the displayed message.
Note
- On Mac computers, drag and drop the memory card icon or the drive icon into the "Trash" icon. The camera will be disconnected from the computer.
- On Windows 7/Windows 8 computers, the disconnection icon may not appear. In that case, you can skip the steps above.
- Do not remove the USB cable from the camera while the access lamp is lit. The data may be damaged.
Introduction to computer software
We offer the following computer software to enhance your enjoyment of photos/movies. Access one of the following URLs using your Internet browser and then download the software by following the onscreen instructions.
If one of these software is already installed on your computer, update it to the latest version before use.
Windows:
http://www.sony.co.jp/imsoft/Win/
Mac:
You can check the recommended operating environment for the software from the following URL:
http://www.sony.net/pcenv/
Image management software (PlayMemories Home)
PlayMemories Home allows you to import still images and movies to your computer and view or use them.
You need to install PlayMemories Home to import XAVC S movies or AVCHD movies to your computer.
You can access the download website directly from the following URL:
http://www.sony.net/pm/
- When you connect the camera to your computer, new functions may be added to PlayMemories Home. Connecting the camera to your computer is therefore recommended even if PlayMemories Home has already been installed on the computer.
RAW processing/remote camera control software
- You can develop and edit RAW images using various adjustment functions like tone curve and sharpness.
- With the software, you can change the camera settings or release the shutter from a computer connected via a USB cable.
To control the camera using the software, first select MENU →

(Setup) [USB Connection] [PC Remote], then connect the
camera to a computer via a USB cable.
GB
Using MENU items
You can change settings related to all the camera operations including shooting, playback, and operating method. You can also execute camera functions from the MENU.
1 Press the MENU button to display the menu screen.
2 Select the desired setting you want to adjust using the top/ bottom/left/right sides of the control wheel or by turning the control wheel, and then press the center of the control wheel.
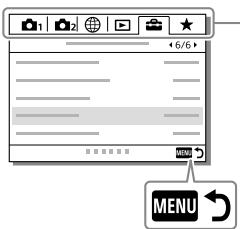
Select an icon at the top of the screen and press the left/right side of the control wheel to move to another MENU item.
Press the MENU button to go back to the previous screen.
3 Select the desired setting value, and press the center to confirm your selection.
List of MENU items
For details on each MENU items, refer to the reference page in the last column or the Help Guide.
1 (Camera Settings 1)
Red tab
| Quality/Image Size | ||
| File Format | Sets the file format for still images. ([RAW] / [JPEG], etc.) | 44 |
| RAW File Type | Selects the file type for RAW images. | Help Guide |
| JPEG Quality | Selects the JPEG image quality for [RAW & JPEG] or [JPEG] under [File Format]. | 44 |
| JPEG Image Size | Selects the size of still images. (L / M / S) | 43 |
| Aspect Ratio | Selects the aspect ratio for still images. | Help Guide |
| APS-C/Super 35mm | Sets whether to record in APS-C-equivalent size for still images and Super 35 mm-equivalent size for movies. | Help Guide |
| Long Exposure NR | Sets noise reduction processing for shots with a shutter speed of 1 second or longer. | Help Guide |
| High ISO NR | Sets noise reduction processing for high-sensitivity shooting. | Help Guide |
| Color Space | Changes the color space (range of reproducible colors). | Help Guide |
| Lens Comp. | Selects the type of lens compensation. | Help Guide |
| Shoot Mode/Drive | ||
| Scene Selection | Selects pre-set settings to match various scene conditions. ([Portrait] / [Sports Action], etc.) | Help Guide |
| Drive Mode | Sets the drive mode, such as for continuous shooting. ([Self-timer] / [Cont. Bracket], etc.) | 38, Help Guide |
| Bracket Settings | Sets self-timer shooting in bracket mode, shooting order for exposure bracketing, and white balance bracketing. | Help Guide |
| MR 1/2 Recall | Calls up settings pre-registered to [MR 1/2 Memory]. | Help Guide |
| MR 1/2 Memory | Registers the desired modes and camera settings. | Help Guide |
| MR Select Media | Selects the memory card slot from which settings are recalled or to which settings are registered for M1 through M4. | Help Guide |
| Reg Cust Shoot Set | Assign functions to the custom key to recall when shooting. | Help Guide |
| AF | ||
| Focus Mode | Selects the focus mode. ([Single-shot AF] / [Continuous AF], etc.) | 31 |
| Priority Set in AF-S | Sets the timing of the shutter release when [Focus Mode] is set to [Single-shot AF], [DMF] or [Automatic AF] with a still subject. | Help Guide |
| Priority Set in AF-C | Sets the timing of the shutter release when [Focus Mode] is set to [Continuous AF] or [Automatic AF] with a moving subject. | Help Guide |
| Focus Area | Selects the area of focus. ([Wide] / [Flexible Spot], etc.) | 33 |
| Focus Settings | Allows you to focus using the front dial, rear dial or control wheel. | Help Guide |
| Swt. V/H AF Area | Sets whether to adjust the [Focus Area] and the position of the focusing frame based on the camera's position (horizontal or vertical). | Help Guide |
| AF Illuminator | Sets the AF illuminator, which provides light to aid focusing in dark scenes. | Help Guide |
| Center Lock-on AF | Sets the function to track a subject and continue focusing when pressing the center of the control wheel in the shooting screen. | Help Guide |
| Set. Face Prty in AF | Sets whether the camera focuses based on detected faces. | Help Guide |
| AF Track Sens | Sets the AF tracking sensitivity for the still image mode. | Help Guide |
| AF System | Sets the auto focus method when an LA-EA1/LA-EA3 Mount Adaptor (sold separately) is attached. | Help Guide |
| AF w/ shutter | Sets whether to perform auto focusing when the shutter button is pressed halfway down. This is useful when you want to adjust the focus and exposure separately. | Help Guide |
| Pre-AF | Sets whether or not to perform auto focus before the shutter button is half pressed. | Help Guide |
| Eye-Start AF | Sets whether to use auto focus when you look through the viewfinder if an LA-EA2/LA-EA4 Mount Adaptor (sold separately) is attached. | Help Guide |
| AF Area Regist. | Sets whether to move the focusing frame to a preassigned position when shooting still images. | Help Guide |
| Del. Reg. AF Area | Deletes the focusing frame position information that was registered using [AF Area Regist]. | Help Guide |
| AF Area Auto Clear | Sets whether the focus area is displayed all the time or disappears automatically shortly after focusing. | Help Guide |
| Disp. cont. AF area | Sets whether or not to display the focus area in [Continuous AF] mode. | Help Guide |
| AF Micro Adj. | Finely adjusts the autofocused position, when using the LA-EA2 or LA-EA4 Mount Adaptor (sold separately). | Help Guide |
| Exposure | ||
| Exposure Comp. | Compensates for the brightness of the entire image. | Help Guide |
| Reset EV Comp. | Sets whether to maintain the exposure value set using [Exposure Comp.] when you turn off the power when the exposure compensation dial position is set to “0.” | Help Guide |
| ISO | Sets the ISO sensitivity. ([ISO AUTO], etc.) | Help Guide |
| ISO AUTO Min. SS | Sets the slowest shutter speed at which ISO sensitivity will start to change in [ISO AUTO] mode. | Help Guide |
| Metering Mode | Selects the method for measuring brightness. ([Multi] / [Spot], etc.) | Help Guide |
| Face Prty in Mlti Mtr | Sets whether the camera measures brightness based on detected faces when [Metering Mode] is set to [Multi]. | Help Guide |
| Spot Metering Point | Sets whether to coordinate the spot metering point with the focus area when [Focus Area] is set to [Flexible Spot] or [Expand Flexible Spot]. | Help Guide |
| Exposure step | Selects the size of the increment step for shutter speed, aperture, and exposure compensation values. | Help Guide |
| AEL w/ shutter | Sets whether to lock the exposure when the shutter button is pressed halfway down. This is useful when you want to adjust the focus and exposure separately. | Help Guide |
| Exposure Std. Adjust | Adjusts the standard for the correct exposure value for each metering modes. | Help Guide |
| Flash | ||
| Flash Mode | Sets the flash settings. | Help Guide |
| Flash Comp. | Adjusts the intensity of flash output. | Help Guide |
| Exp. comp. set | Sets whether to reflect exposure compensation value to flash compensation. | Help Guide |
| Wireless Flash | Sets whether to shoot with the wireless flash. | Help Guide |
| Red Eye Reduction | Reduces the red-eye phenomenon when using flash. | Help Guide |
| Color/WB/Img. Processing | ||
| White Balance | Corrects the tone effect of the ambient light to shoot whitish objects in a white tone. ([Auto] / [Daylight], etc.) | Help Guide |
| Priority Set in AWB | Selects which tone to prioritize when shooting under lighting conditions such as incandescent light with [White Balance] set to [Auto]. | Help Guide |
| DRO/Auto HDR | Analyzes the contrast of light and shadow between the subject and the background by dividing the image into small areas, and creates an image with the optimal brightness and gradation. | Help Guide |
| Creative Style | Selects the desired image processing. You can also adjust contrast, saturation, and sharpness. ([Vivid] / [Portrait], etc.) | Help Guide |
| Picture Effect | Shoots images with a texture unique to the selected effect. ([Toy Camera] / [Rich-tone Mono], etc.) | Help Guide |
GB
| Picture Profile | Changes settings such as color and tone when recording images. * This function is for skilled movie creators. | Help Guide |
| Focus Assist | ||
| Focus Magnifier | Enlarges the image before shooting so that you can check the focus. | Help Guide |
| Focus Magnif. Time | Sets the length of time the image will be shown in an enlarged form. | Help Guide |
| Initial Focus Mag. | Sets the initial magnification scale when using [Focus Magnifier]. | Help Guide |
| AF in Focus Mag. | Sets whether or not to autofocus when an enlarged image is being displayed. While the enlarged image is being displayed, you can focus within a smaller area than the flexible spot. | Help Guide |
| MF Assist | Displays an enlarged image when focusing manually. | Help Guide |
| Peaking Setting | Sets the peaking function, which enhances the outline of in-focus areas when focusing manually. | Help Guide |
| Shoot Assist | ||
| Anti-flicker Shoot. | Detects flickering/blinking from artificial light sources such as fluorescent lighting and times the shooting of images to moments when flickering will have less of an impact. | Help Guide |
| Face Registration | Registers or changes the person to be given priority when focusing. | Help Guide |
| Regist. Faces Priority | Detects the registered face with higher priority using [Face Registration]. | Help Guide |
| Movie | ||
| Exposure Mode | Sets the exposure mode when shooting movies. | Help Guide |
| SFX Exposure Mode | Sets the exposure mode when shooting slow-motion/quick-motion movies. | Help Guide |
| File Format | Selects the movie file format. ([XAVC S 4K] / [AVCHD], etc.) | 45 |
| Record Setting | Selects a frame-rate and bit-rate for the movie. | 46 |
| S&Q Settings | Changes the settings for slow-motion and quick-motion movie shooting. | Help Guide |
| Proxy Recording | Records low-bit-rate proxy files simultaneously when recording XAVC S movies. | Help Guide |
| AF drive speed | Switches focusing speed when using autofocus in movie mode. | Help Guide |
| AF Track Sens | Sets the AF tracking sensitivity for the movie mode. | Help Guide |
| Auto Slow Shut. | Sets the function that automatically adjusts the shutter speed following the brightness of the environment in movie mode. | Help Guide |
| Audio Recording | Sets whether to record audio when shooting a movie. | Help Guide |
| Audio Rec Level | Adjusts the audio recording level during movie recording. | Help Guide |
| Audio Level Display | Sets whether to display the audio level. | Help Guide |
| Audio Out Timing | Sets the timing of audio output during the movie recording. | Help Guide |
| Wind Noise Reduct. | Reduces wind noise during movie recording. | Help Guide |
| Marker Display | Sets whether to display markers on the monitor when recording movies. | Help Guide |
GB
| Marker Settings | Sets which markers to display on the monitor when recording movies. | Help Guide |
| Video Light Mode | Sets the illumination setting for the HVL-LBPC LED light (sold separately). | Help Guide |
| Movie w/ shutter | Records movies using the shutter button. | Help Guide |
| Shutter/SteadyShot | ||
| Silent Shooting | Shoots images without the shutter sound. | Help Guide |
| e-Front Curtain Shut. | Sets whether to use the electronic front curtain shutter function. | Help Guide |
| Release w/o Lens | Sets whether to release the shutter when the lens is not attached. | Help Guide |
| Release w/o Card | Sets whether to release the shutter when a memory card is not inserted. | Help Guide |
| SteadyShot | Sets whether to activate SteadyShot for shooting. | Help Guide |
| SteadyShot Settings | Sets SteadyShot settings. | Help Guide |
| Zoom | ||
| Zoom | Sets the zoom scale for zoom functions other than the optical zoom. | Help Guide |
| Zoom Setting | Sets whether to use the Clear Image Zoom and Digital Zoom when zooming. | Help Guide |
| Zoom Ring Rotate | Assigns the zoom in/out to the rotational direction of the zoom lens. This function is only available with a power zoom lens that is compatible with this function. | Help Guide |
| Display/Auto Review | ||
| DISP Button | Sets the type of information to be displayed on the monitor or in the viewfinder when the DISP button is pressed. | Help Guide |
| FINDER/MONITOR | Sets the method for switching the display between the electronic viewfinder and the monitor. | Help Guide |
| Zebra Setting | Sets the stripes displayed to adjust brightness. | Help Guide |
| Grid Line | Displays grid lines for adjusting the image composition. | Help Guide |
| Exposure Set. Guide | Sets the guide displayed when exposure settings are changed in the shooting screen. | Help Guide |
| Live View Display | Sets whether to reflect settings such as exposure compensation in screen display. | Help Guide |
| Cont. Shoot. Length | Sets whether to display an indicator of the remaining time for which continuous shooting can be performed at the same shooting speed. | 39 |
| Auto Review | Sets auto review to display the captured image after shooting. | Help Guide |
| Custom Operation | ||
| Custom Key | Assigns functions to the various keys so that you can perform operations more quickly by pressing the keys when shooting still images. | Help Guide |
| Custom Key | Assigns functions to the various keys so that you can perform operations more quickly by pressing the keys when shooting movies. | Help Guide |
| Custom Key | Assigns functions to the keys so that you can perform operations more quickly by pressing the keys when playing back images. | Help Guide |
| Function Menu Set. | Customizes the functions displayed when the Fn (Function) button is pressed. | Help Guide |
| Dial Setup | Sets the functions of the front and rear dials when the exposure mode is set to M. Dials can be used for adjusting shutter speed and aperture value. | Help Guide |
| Av/Tv Rotate | Sets the direction of turning the front or rear dial or the control wheel to adjust the aperture value or shutter speed. | Help Guide |
| Dial Ev Comp | Sets whether to compensate the exposure with the front or rear dial. | Help Guide |
| MOVIE Button | Enables or disables for the MOVIE button. | Help Guide |
| Lock Operation Parts | Sets whether to disable the multi- selector, control wheel, or front and rear dials temporarily when the Fn button is pressed and held down. | Help Guide |
| Audio signals | Selects whether the camera beeps during auto focus and self-timer operations. | Help Guide |

(Network)
Green tab
| Snd to Smrtphn Func | Sets movies to be transferred to a smartphone, or transfers images to a smartphone. | Help Guide |
| Send to Computer | Backs up images by transferring them to a computer connected to a network. | Help Guide |
| FTP Transfer Func. | Sets image transfer using FTP and executes it. * Basic knowledge of FTP server is required. | 50 |
| View on TV | Allows you to view images on a network-enabled TV. | Help Guide |
| Ctrl w/ Smartphone | Sets the condition for connecting the camera to a smartphone. | Help Guide |
| Airplane Mode | Disables wireless communications from the device such as Wi-Fi, NFC, and Bluetooth function. | Help Guide |
| Wi-Fi Settings | Allows you to register your access point and check or change the Wi-Fi connection information. | Help Guide |
| Bluetooth Settings | Controls the settings for connecting the camera with a smartphone via a Bluetooth connection. | Help Guide |
| □Loc. Info. Link Set. | Obtains location information from the paired smartphone and records it to captured images. | Help Guide |
| Edit Device Name | Changes the device name under Wi-Fi Direct, etc. | Help Guide |
| Imp Root Certificate | Imports a root certificate to the camera. | Help Guide |
| Reset Network Set. | Reset all the network settings. | Help Guide |
(Playback)
Blue tab
| Protect | Protects recorded images against accidental erasure. | Help Guide |
| Rotate | Rotates the image. | Help Guide |
| Delete | Deletes images. | Help Guide |
| Rating | Assigns rating to recorded images on a scale from ★ to ★★. | Help Guide |
| Rating Set (Cust Key) | Sets the rating (number of ★) that can be selected using the custom key to which [Rating] has been assigned with [■] Custom Key. | Help Guide |
| Specify Printing | Specifies in advance on the memory card which still images to print out later. | Help Guide |
| Copy | Copies images from the memory card in the memory card slot designated in [Select PB Media] to the memory card in the other slot. | Help Guide |
| Photo Capture | Captures a chosen scene in a movie to save as a still image. | Help Guide |
| ® Enlarge Image | Enlarges the playback images. | Help Guide |
| ® Enlarge Init. Mag. | Sets the initial magnification scale when playing back enlarged images. | Help Guide |
| ® Enlarge Initial Pos. | Sets the initial magnification area when playing back enlarged images. | Help Guide |
| Slide Show | Plays a slide show. | Help Guide |
| Select PB Media | Selects the memory card slot of the memory card to be played back. | Help Guide |
| View Mode | Plays back images from a specified date or specified folder of still images and movies. | Help Guide |
| Image Index | Displays multiple images at the same time. | Help Guide |
| Disp Cont Shoot Grp | Sets whether to display continuously shot images as a group. | Help Guide |
| Display Rotation | Sets the playback orientation for images shot vertically. | Help Guide |
| Image Jump Setting | Sets which dial and method to use for jumping between images during playback. | Help Guide |
| Monitor Brightness | Adjusts the brightness of the screen. | Help Guide |
| Viewfinder Bright. | Sets the brightness of the electronic viewfinder. | Help Guide |
| Finder Color Temp. | Sets the color temperature of the viewfinder. | Help Guide |
| Gamma Disp. Assist | Adjusts the screen to make monitoring easier when displaying an S-Log or HLG movie. | Help Guide |
| Volume Settings | Sets the volume for movie playback. | Help Guide |
| Delete confirm. | Sets whether [Delete] or [Cancel] is preselected in the delete confirmation screen. | Help Guide |
| Display Quality | Sets the display quality. * When [High] is selected, the battery is consumed more quickly. * When the temperature of the camera is high, [Display Quality] may be locked to [Standard]. | Help Guide |
| Pwr Save Start Time | Sets the time intervals to automatically switch to power save mode. | Help Guide |
| Auto Pwr OFF Temp. | Sets the camera temperature at which the camera turns off automatically during shooting. When shooting in hand-held mode, set to [Standard]. | Help Guide |
| NTSC/PAL Selector*1 | Changes the TV format of the device so that you can shoot in a different movie format. | Help Guide |
| Cleaning Mode | Starts the cleaning mode to clean the image sensor. | Help Guide |
| Touch Operation | Sets whether or not to activate the touch operation of the monitor. | 40 |
| Touch Panel/Pad | Selects whether to activate touch panel operation when shooting with the monitor, or touch pad operation when shooting with the viewfinder. | 40 |
| Touch Pad Settings | Adjusts settings related to touch pad operation. | Help Guide |
| Demo Mode | Sets demonstration playback of movies to on or off. | Help Guide |
| TC/UB Settings | Sets the time code (TC) and user bit (UB). * This function is for skilled movie creators. | Help Guide |
| Remote Ctrl | Sets whether to use the infrared remote control. | Help Guide |
| HDMI Settings | Sets the HDMI settings. * Images will not appear on the monitor of the camera if you record movies while the camera is connected to an HDMI device with [File Format] set to [XAVC S 4K]. | Help Guide |
| 4K Output Sel. | Sets how to record and output 4K movies via HDMI when the camera is connected to an external recorder/ player that supports 4K. | Help Guide |
| USB Connection | Sets the USB connection method. | Help Guide |
| USB LUN Setting | Enhances compatibility by limiting the functions of USB connection. Set to [Multi] in normal conditions and to [Single] only when the connection cannot be established. | Help Guide |
| USB Power Supply | Sets whether to supply power via USB connection when the camera is connected to a computer or USB device. | Help Guide |
| PC Remote Settings | Controls the PC remote shooting settings. | Help Guide |
| Language | Selects the language. | 28 |
| Date/Time Setup | Sets the date, time, and daylight savings. | 28 |
| Area Setting | Sets the location of use. | Help Guide |
| Copyright Info | Sets copyright information for still images. | Help Guide |
| Format | Formats the memory card. | Help Guide |
| File Number | Sets the method used to assign file numbers. | Help Guide |
| Set File Name | Changes the first 3 characters of the file names for still images. | Help Guide |
| Rec. Media Settings | Sets the method for recording images to two memory card slots. | Help Guide |
| Select REC Folder | Changes the folder selected for storing still images. | Help Guide |
| New Folder | Creates a new folder for storing still images. | Help Guide |
| Folder Name | Sets the folder format for still images. | Help Guide |
| Recover Image DB | Recovers the image database file and enables recording and playback. | Help Guide |
| Display Media Info. | Displays the remaining recording time of movies and the recordable number of still images on the memory card. | Help Guide |
| Version | Displays the camera software version. | Help Guide |
| Setting Reset | Restores settings to their defaults. Select [Initialize] to restore all settings to their default values. | Help Guide |
| Add Item | Adds desired MENU items to ★ (My Menu). | Help Guide |
| Sort Item | Sorts the MENU items added to ★ (My Menu). | Help Guide |
| Delete Item | Deletes MENU items added to ★ (My Menu). | Help Guide |
| Delete Page | Deletes all the MENU items on a page in ★ (My Menu). | Help Guide |
| Delete All | Deletes all the MENU items added to ★ (My Menu). | Help Guide |
*1 If you change this item, you will need to format the memory card for compatibility with the PAL or NTSC system. Also, note that it may not be possible to play back movies recorded for the NTSC system on PAL system TVs.
List of icons on the monitor
The displayed contents and their positions in the illustrations are just guidelines, and may differ from the actual displays.
Icons on the shooting screen
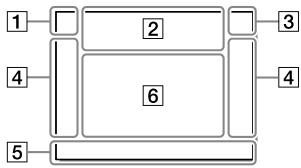
Monitor mode
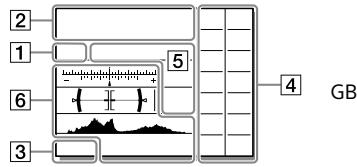
Viewfinder mode
1 Shooting mode/ Scene recognition

P P* A S M
iP HsM
SOP SA A SSO M
Shooting mode (29)

M 1 M 2 M 3 M 4
Register number (58)


Scene Recognition icons


Scene Selection
2 Camera settings


NO CARD
Memory card status (24, 81)
100
Remaining number of recordable images (83)
1113
Writing data / Number of images left to write
3:2 16:9
Aspect ratio of still images (57)
24M 20M 10M 8.7M 6.0M 5.1M
2.6M 2.2M
Image size of still images (43)
RAW RAW
RAW recording (compressed/ uncompressed) (44)
X.FINE FINE STD
JPEG Quality (44)
XAVCS4K XAVCSHD AVCHD
File format of movies (45)
100
60
50
25
16
:FX
FH
Record setting of movies (46)
120p 60p 60i 30p 24p
100p 50p 50i 25p
Frame rate of movies (46)
100
60
50
25 Px
16
Proxy Recording (63)
120fps 60fps 30fps 15fps 8fps
4fps
100fps 50fps 25fps 12fps 6fps
3fps 2fps 1fps
Frame rate for slow/quick motion shooting (63)
APS-C/Super 35mm (57)
40
Flash charge in progress
VIEW
Setting Effect OFF (65)
ON
AF Illuminator (59)
Flicker
Flickering detected (62)
()
()
()
SteadyShot off/on, Camera shake warning (64)
(8m
图 电
8mm
SteadyS. Focal Len./ Camera shake warning (64)
s+
c
D
Smart Zoom /
Clear Image Zoom / Digital Zoom (64)
-PC-
PC remote (70)
Bright Monitoring
公
Silent Shooting (64)
Infrared remote control
OFF
No audio recording of movies (63)
Wind Noise Reduct. (63)

Copyright information writing on (71)
Assist Assist Assist S-Log2 S-Log3 HL6709 HL6201
Gamma Disp. Assist (69)

Focus Cancel (41)

Lock-on AF Cancel
Spot Focus
Performing [Spot Focus] (42)

NFC active (49)

Bluetooth connection available / Bluetooth connection unavailable (67)


Connected to smartphone / Not connected to smartphone


Obtaining location information/ Location information cannot be obtained (67)

Airplane Mode (67)

Overheating warning


Database file full/Database file error

Battery
100%
Remaining battery (22)

Remaining battery warning

USB power supply (70)

Shooting settings
□ HI My MD Lo 10
HH+
BBH
845
845
BBBWB
23
0.3eV3
0.3eV3
0.3eV3
HI
DBDPO
845
845
Wb HB DRO LO
Drive Mode (38)
AUTS SLOW REAR WL SW LSW WSL 80 SLOW REAR WL
Flash Mode (61) /
Wireless Flash (61) /
Red Eye Reduction (61)
±0.0
Flash Comp. (61)
AF-S AF-A AF-C DMF MF
Focus Mode (31)
中 中 中 中 中 中 中
Focus Area (33)
JPEG RAW RAW RAW+J RAW+J
File Format (44)
中 中 中
Metering Mode (60)
AWB
AWB
AWB
-10+1 2
AWB
7500K A5 G5
White Balance (Auto, Preset, Underwater Auto, Custom, Color temperature, Color filter) (61)


D-Range Opt./Auto HDR (61)


+3+3+3
Creative Style (61)/Contrast, saturation, and sharpness


Picture Effect (61)


Face Priority in AF (59)


Picture Profile (62)


Prioritize Rec. Media (71)
Focus indicator/exposure settings


Focus indicator (32)
1/250
Shutter speed
F3.5
Aperture value


Exposure compensation (60)/
Metered Manual
ISO400 ISO AUTO
ISO sensitivity (60)


AE lock/ FEL lock
6 Guides/other
Lock-on AF
Lock-on AF Cancel
Guide display for Lock-on AF (59)
Focus Cancel
Guide display for canceling focusing (41)
Shutter speed indicator
54.28 56.11 22.
Aperture indicator

Histogram

Digital level gauge
STBYREC
Movie recording standby/Movie recording in progress
1:00:12
Actual movie recording time (hours: minutes: seconds)

Audio Level Display (63)

REC Control (70)
00:00:00:00
Time code (hours: minutes: seconds: frames) (70)
00 00 00 00
User Bit (70)
Icons on the playback screen
Single-image playback display
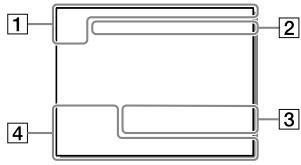
Histogram display
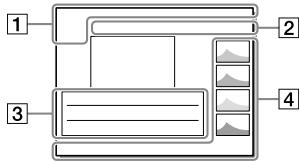
1 Basic information
1 2
Playback media (68)


View Mode (68)

Rating (67)
0
Protect (67)
DPOF
DPOF set (67)
3/7
File number/Number of images in the view mode

NFC active (49)

Remaining battery (22)

Continuous shooting group (68)
Px
Proxy movie included (63)
2 Camera settings
Refer to "Icons on the shooting screen" (page 73).
3 Shooting settings

Picture Effect error

Auto HDR error (61)
35mm
Lens focal length
HLG
HDR recording (Hybrid Log-Gamma)
Refer to "Icons on the shooting screen" (page 73) for other icons displayed in this area.
4 Image information

90^44^55^
233^44^55^
Latitude/longitude information
(67)
2018-1-1 10:37AM
Date of recording (28)

100-0003
Folder number - File number
(71)


Histogram (Luminance/R/G/B)
Specifications
Battery life and number of recordable images
| Battery life | Number of images | ||
| Shooting (still images) | Screen mode | — | Approx. 710 |
| Viewfinder mode | — | Approx. 610 | |
| Actual shooting (movies) | Screen mode | Approx. 125 min. | — |
| Viewfinder mode | Approx. 115 min. | — | |
| Continuous shooting (movies) | Screen mode | Approx. 210 min. | — |
| Viewfinder mode | Approx. 200 min. | — | |
- The above estimates for battery life and number of recordable images apply when the battery pack has been fully charged. The battery life and number of images may decrease depending on the conditions of use.
-
The battery life and number of recordable images are estimates based on shooting with the default settings under the following conditions:
-
Using the battery pack at an ambient temperature of 25^ (77^)
- Using a Sony SDXC memory card (U3) (sold separately)
-
Using a lens FE 28-70 mm F3.5-5.6 OSS
-
The numbers for "Shooting (still images)" are based on the CIPA standard and shooting under the following conditions:
(CIPA: Camera & Imaging Products Association)
- One picture is taken every 30 seconds.
-
The power is turned on and off once every ten times.
-
The number of minutes for movie shooting is based on the CIPA standard and shooting under the following conditions:
-
The image quality is set to XAVC S HD 60p 50M / 50p 50M.
- Actual shooting (movies): Battery life based on repeated shooting, zooming, shooting stand-by, turning on/off, etc.
- Continuous shooting (movies): Battery life based on non-stop shooting until the limit (29 minutes) has been reached, and then continued by pressing the MOVIE (Movie) button again. Other functions, such as zooming, are not operated.
Memory cards that can be used
When using microSD memory cards or Memory Stick Micro media with this camera, be sure to use the appropriate adaptor.
SD memory cards
| Recording format | Supported memory card | |
| Still image | SD/SDHC/SDXC card | |
| AVCHD | SD/SDHC/SDXC card (Class 4 or faster, or U1 or faster) | |
| XAVC S | 4K 60 Mbps* HD 50 Mbps or lower* HD 60 Mbps | SDHC/SDXC card (Class 10, or U1 or faster) |
| 4K 100 Mbps* HD 100 Mbps | SDHC/SDXC card (U3) | |
- Including when recording proxy movies at the same time
Memory Stick media
| Recording format | Supported memory card | |
| Still image | Memory Stick PRO Duo/ Memory Stick PRO-HG Duo | |
| AVCHD | Memory Stick PRO Duo (Mark 2)/ Memory Stick PRO-HG Duo | |
| XAVC S | 4K 60 Mbps* HD 50 Mbps or lower* HD 60 Mbps | Memory Stick PRO-HG Duo |
| 4K 100 Mbps* HD 100 Mbps | — | |
- Including when recording proxy movies at the same time
Note
- Use the slot 1 when you are using a UHS-II memory card. Also, select MENU → (Setup) → [Rec. Media Settings] → [Prioritize Rec. Media] → [Slot 1].
- Memory Stick PRO Duo media cannot be used in the slot 1.
- When an SDHC memory card is used to record an XAVC S movie over extended periods of time, the recorded movies will be divided into files 4 GB in size. The divided files can be handled as a single file by importing them to a computer using PlayMemories Home.
-
When recording a movie on memory cards in both the slot 1 and the slot 2 with following camera settings, insert two memory cards with the same file system. XAVC S movies cannot be recorded simultaneously when using a combination of the exFAT file system and FAT32 file system.
-
[File Format] is set to [XAVC S 4K] or [XAVC S HD]
- [Recording Mode] under [Rec. Media Settings] is set to [Simult. (图1)] or [Simult. (图2)]
| Memory card | File system |
| SDXC memory card | exFAT |
| Memory Stick PRO Duo (Mark2) | |
| Memory Stick PRO-HG Duo | FAT32 |
| SDHC memory card |
- Charge the battery pack sufficiently before attempting to recover the database files on the memory card.
Number of recordable images
When you insert a memory card into the camera and set the ON/OFF (Power) switch to "ON," the number of images that can be recorded (should you continue to shoot using the current settings) is displayed on the screen.
Note
- When "0" (the number of recordable images) flashes in orange, the memory card is full. Replace the memory card with another one, or delete images from the current memory card.
- When "NO CARD" flashes in orange, it means no memory card has been inserted. Insert a memory card.
GB
The number of images that can be recorded on a memory card
The following table shows the approximate number of images that can be recorded on a memory card formatted with this camera. The values are defined using Sony standard memory cards for testing. The values may vary depending on the shooting conditions and the type of memory card used.
[JPEG Image Size]: [L: 24M]
(Units: Images)
| JPEG Quality/ File Format | 8 GB | 32 GB | 64 GB | 256 GB |
| Standard | 1100 | 4600 | 9200 | 36000 |
| Fine | 790 | 3200 | 6400 | 25000 |
| Extra fine | 435 | 1750 | 3500 | 14000 |
| RAW & JPEG (Compressed RAW)*2 | 215 | 870 | 1750 | 7000 |
| RAW (Compressed RAW) | 295 | 1200 | 2400 | 9600 |
| RAW & JPEG (Uncompressed RAW)*2 | 125 | 510 | 1000 | 4100 |
| RAW (Uncompressed RAW) | 150 | 610 | 1200 | 4950 |
1 When Aspect Ratio is set to other than [3:2], you can record more images than the numbers shown in the table (except when [RAW] is selected).
2 [JPEG Quality] when [RAW & JPEG] is selected: [Fine]
Note
- Even if the number of recordable images is higher than 9999 images, "9999" will appear.
- The numbers shown are when using a Sony memory card.
Recordable movie times
The table below shows the approximate total recording times using a memory card formatted with this camera. The values may vary depending on the shooting conditions and the type of memory card used. The recording times for when [File Format] is set to [XAVC S 4K] and [XAVC S HD] are recording times when shooting with [Proxy Recording] set to [Off].
(h(hour), m (minute))
| File Format | Record Setting | 8 GB | 32 GB | 64 GB | 256 GB |
| XAVC S 4K | 30p 100M/25p 100M | 8 m | 35 m | 1 h 15 m | 5 h 15 m |
| 30p 60M/25p 60M | 10 m | 1 h | 2 h 5 m | 8 h 35 m | |
| 24p 100M* | 8 m | 35 m | 1 h 15 m | 5 h 15 m | |
| 24p 60M* | 10 m | 1 h | 2 h 5 m | 8 h 35 m | |
| XAVC S HD | 120p 100M/100p 100M | 8 m | 35 m | 1 h 15 m | 5 h 15 m |
| 120p 60M/100p 60M | 10 m | 1 h | 2 h 5 m | 8 h 35 m | |
| 60p 50M/50p 50M | 15 m | 1 h 15 m | 2 h 30 m | 10 h 25 m | |
| 60p 25M/50p 25M | 30 m | 2 h 25 m | 5 h | 20 h 10 m | |
| 30p 50M/25p 50M | 15 m | 1 h 15 m | 2 h 30 m | 10 h 25 m | |
| 30p 16M/25p 16M | 50 m | 3 h 50 m | 7 h 45 m | 31 h 25 m | |
| 24p 50M* | 15 m | 1 h 15 m | 2 h 30 m | 10 h 25 m | |
| AVCHD | 60i 24M (FX)/50i 24M (FX) | 40 m | 2 h 55 m | 6 h | 24 h 15 m |
| 60i 17M (FH)/50i 17M (FH) | 55 m | 4 h 5 m | 8 h 15 m | 33 h 15 m |
-
Only when [NTSC/PAL Selector] is set to NTSC
-
Continuous shooting is possible for approximately 29 minutes (a product specification limit). The continuous recordable time may differ in the following situations:
-
When shooting slow-motion/quick-motion movies: Recording will automatically stop when the recorded file reaches approximately 29 minutes (the played back movie reaches approximately 29 minutes).
(Recording will automatically stop when the recorded file reaches approximately 15 minutes if [S&O Record Setting] is set to [60p/50p] and [S&O Frame Rate] is set to [30fps/25fps].)
- The times for slow-motion/quick-motion movies are playback times, not recording times.
Note
- The recordable time of movies varies because the camera is equipped with VBR (Variable Bit-Rate), which automatically adjusts image quality depending on the shooting scene. When you record a fast-moving subject, the image is clearer but the recordable time is shorter because more memory is required for recording. The recordable time also varies depending on the shooting conditions, the subject or the image quality/size settings.
- The times shown are recordable times using a Sony memory card.
Notes on continuous movie recording
-
High-quality movie recording and high-speed continuous shooting require large amounts of power. Therefore, if you continue to shoot, the temperature inside the camera will rise, especially that of the image sensor. In such cases, the camera will turn off automatically because the surface of the camera is heated to a high temperature or the high temperature affects the quality of the images or the internal mechanism of the camera.
-
The duration of time available for continuous movie recording when the camera records with the default settings after the power has been turned off for a while is as follows. The values indicate the continuous time from when the camera starts recording until the camera stops recording.
| Ambient temperature | Continuous recording time for movies (HD) | Continuous recording time for movies (4K) |
| 20°C (68°F) | Approx. 29 min. | Approx. 29 min. |
| 30°C (86°F) | Approx. 29 min. | Approx. 29 min. |
| 40°C (104°F) | Approx. 29 min. | Approx. 29 min. |
HD: XAVC S HD (60p 50M/50p 50M, when the camera is not connected via Wi-Fi)
4K: XAVC S 4K (24p 60M/25p 60M, when the camera is not connected via Wi-Fi)
- The duration of time available for movie recording varies with the temperature, file format/record setting for movies, Wi-Fi network environment, or condition of the camera before you start recording. If you frequently recompose or shoot images after the power is turned on, the temperature inside the camera will rise and the recording time available will be shorter.
- If the [icon appears, the temperature of the camera has risen.
- If the camera stops movie recording due to a high temperature, leave it for some time with the power turned off. Start recording after the temperature inside the camera drops fully.
-
If you observe the following points, you will be able to record movies for longer periods of time.
-
Keep the camera out of direct sunlight.
-
Turn the camera off when it is not being used.
-
When [File Format] is set to [AVCHD], the file size of movies is limited to approx. 2 GB. If the movie file size reaches approx. 2 GB during recording, a new movie file will be created automatically.
Specifications
Camera
[System]
Camera Type: Interchangeable Lens Digital Camera
Lens: Sony E-mount lens
[Image sensor]
Image format: 35 mm full frame (35.6 mm × 23.8 mm), CMOS image sensor
Effective pixel number of camera: Approx. 24 200 000 pixels
Total pixel number of camera: Approx. 25300000 pixels
[SteadyShot]
In-camera sensor shift image stabilization system
[Auto focus system]
Detection system: Phase detection system/Contrast detection system
Sensitivity Range: -3EV to +20EV (at ISO 100 equivalent, F2.0)
[Electronic viewfinder]
Type: 1.3 cm (0.5 type) Electronic Viewfinder
Total number of dots: 2359296 dots
Magnification: Approx. 0.78× for 50 mm lens at infinity, -1m^-1
Eye Point: Approx. 23 mm from the eyepiece and approx. 18.5 mm from the eyepiece frame at -1m^-1
Diopter Adjustment: -4.0m^-1 to +3.0m^-1
[Monitor]
7.5 cm (3.0 type) TFT drive, touch panel
Total number of dots: 921600 dots
[Exposure control]
Metering method: 1200-zone evaluative metering
Metering Range: -3 EV to +20 EV (at ISO 100 equivalent with F2.0 lens)
ISO sensitivity (Recommended exposure index):
Still images: ISO 100 to ISO 51 200 (Extended ISO: Minimum ISO 50, maximum ISO 204 800)
Movies: ISO 100 to ISO 51 200 equivalent
[Shutter]
Type: Electronically-controlled, vertical-traverse, focal-plane type
Speed range:
Still images: 1/8000 second to 30 seconds, BULB
Movies: 1/8000 second to 1/4 second
1080 60i-compatible devices (1080 50i-compatible devices): up to 1/60 (1/50) second in AUTO mode (up to 1/30 (1/25) second in Auto slow shutter mode)
Flash sync speed: 1/250 second (when using a flash manufactured by Sony)
[Recording format]
File format: JPEG (DCF Ver. 2.0, Exif Ver. 2.31, MPF Baseline) compliant, RAW (Sony ARW 2.3 format)
Movie (XAVC S format): MPEG-4 AVC/H.264 XAVC S ver.1.0 format compliant Video: MPEG-4 AVC/H.264 Audio:LPCM 2ch (48 kHz 16 bit)
Movie (AVCHD format): AVCHD format Ver. 2.0 compatible Video: MPEG-4 AVC/H.264 Audio: Dolby Digital 2ch, equipped with Dolby Digital Stereo Creator
Manufactured under license from Dolby Laboratories.
[Recording media]
SLOT 1: Slot for SD cards (UHS-I and UHS-II compatible)
SLOT 2: Multi-slot for Memory Stick PRO Duo media and SD cards (UHS-I compatible)
[Input/output terminals]
USB Type-C terminal: SuperSpeed USB (USB 3.1 Gen 1)
Multi/Micro USB Terminal* Hi-Speed USB (USB 2.0)
- Supports Micro USB compatible devices.
HDMI: HDMI type D micro jack
Storage temperature: -20 to 55^ (-4 to 131^ )
Dimensions (W/H/D) (Approx.): 126.9 × 95.6 × 73.7 mm
126.9× 95.6× 62.7mm
(from grip to monitor)
5× 37 / 8× 3 in.
5× 37 / 8× 21 / 2 in.
(from grip to monitor)
Mass (CIPA compliant) (Approx.): 650 g (1 lb 7.0 oz) (including battery pack, SD card)
[Wireless LAN]
Supported format: IEEE 802.11 b/g/n
Frequency band: 2.4 GHz
Security: WEP/WPA-PSK/WPA2-PSK
Connection method: Wi-Fi Protected SetupTM (WPS)/ Manual
Access method: Infrastructure mode
[NFC]
Tag type: NFC Forum Type 3 Tag compliant
[Bluetooth communications]
Bluetooth standard Ver. 4.1
Frequency band: 2.4 GHz
AC Adaptor AC-UUD12/AC-UE12
Rated input: 100 - 240 V, 50/60 Hz, 0.2 A
Rated output: 5V = -1.5A
Rechargeable battery pack
NP-FZ100
Rated voltage: 7.2V
Lens FE 28-70 mm F3.5-5.6 OSS (Supplied with ILCE-7M3K)
Focal length: 28 mm - 70 mm
Lens groups-elements: 8-9
Angle of view: 75^ - 34^
Minimum focus*: 0.3 m - 0.45 m (0.99 ft. - 1.48 ft.)
- Minimum focus is the shortest distance from the image sensor to the subject.
Maximum magnification: 0.19×
Minimum f-stop: f/22 - f/36
Filter diameter: 55mm
Dimensions (max. diameter × height): Approx. 72.5mm× 83mm (Approx. 2 7/8 inches × 3 3/8 inches)
Mass: Approx. 295 g (Approx. 10.5 oz.)
SteadyShot: Available
Design and specifications are subject to change without notice.
On image data compatibility
This camera conforms with DCF (Design rule for Camera File system) universal standard established by JEITA (Japan Electronics and Information Technology Industries Association).
- Playback of images recorded with your camera on other equipment and playback of images recorded or edited with other equipment on your camera are not guaranteed.
Trademarks

Memory Stick and MemSticks are trademarks or registered trademarks of Sony Corporation.
XAVC S and XAVC S are registered trademarks of Sony Corporation.
- "AVCHD" and the "AVCHD" logotype are trademarks of Panasonic Corporation and Sony Corporation.
Mac is a trademark of Apple Inc., registered in the United States and other countries.
- IOS is a registered trademark or trademark of Cisco Systems, Inc.
- iPhone and iPad are trademarks of Apple Inc., registered in the U.S. and other countries.
- Blu-ray Disc^TM and Blu ray ^TM are trademarks of the Blu-ray Disc Association.
- DLNA and DLNA CERTIFIED are trademarks of Digital Living Network Alliance.
- USB Type- C^TM and USB- C^TM are trademarks of USB Implementers Forum.
- USB-IF SuperSpeed USB Trident logo is a registered trademark of USB Implementers Forum, Inc.
- Dolby, Dolby Audio and double-D symbol are trademarks of Dolby Laboratories.
- The terms HDMI and HDMI High-Definition Multimedia Interface, and the HDMI Logo are trademarks or registered trademarks of HDMI Licensing Administrator, Inc. in the United States and other countries.
- Microsoft and Windows are registered trademarks or trademarks of Microsoft Corporation in the United States and/or other countries.
- SDXC logo is a trademark of SD-3C, LLC.
- Facebook and the "e" logo are trademarks or registered trademarks of Facebook, Inc.
Android and Google Play are trademarks or registered trademarks of Google Inc.
YouTube and the YouTube logo are trademarks or registered trademarks of Google Inc. - Wi-Fi, the Wi-Fi logo and Wi-Fi Protected Setup are registered trademarks or trademarks of the Wi-Fi Alliance.
The N Mark is a trademark or registered trademark of NFC Forum, Inc. in the United States and in other countries. - The Bluetooth® word mark and logos are registered trademarks owned by the Bluetooth SIG, Inc. and any use of such marks by Sony Corporation is under license.
- QR code is a trademark of Denso Wave Inc.
- In addition, system and product names used in this manual are, in general, trademarks or registered trademarks of their respective developers or manufacturers. However, the ^TM or ^ marks may not be used in all cases in this manual.

InfoLITHIUM


MEMORY STICK

3 1

3I
CLASS
CLASS
0
HOMI
HIGH-DEFINITION MULTIMEDIA INTERFACE
AVCHD

XAVCS

Bluetooth
On GNU GPL/LGPL applied software
The software that is eligible for the following GNU General Public License (hereinafter referred to as "GPL") or GNU Lesser General Public License (hereinafter referred to as "LGPL") are included in the product.
This informs you that you have a right to have access to, modify, and redistribute source code for these software programs under the conditions of the supplied GPL/LGPL. Source code is provided on the web. Use the following URL to download it. http://oss.sony.net/Products/Linux/ We would prefer you do not contact us about the contents of source code.
Licenses (in English) are recorded in the internal memory of your product. Establish a Mass Storage connection between the product and a computer to read licenses in the "PMHOME" - "LICENSE" folder.
Additional information on this product and answers to frequently asked questions can be found at our Customer Support Website.
http://www.sony.net/
24M 20M 10M 8.7M 6.0M 5.1M
2.6M 2.2M
120p 60p 60i 30p 24p
100p 50p 50i 25p
120fps 60fps 30fps 15fps 8fps
4fps
100fps 50fps 25fps 12fps 6fps
3fps 2fps 1fps
Assist Assist Assist S-Log2 S-Log3 HLG 709 HLG2020
AF-S AF-A AF-C DMF MF
233^44^55^
(CIPA : Camera & Imaging Products Association)
(h (heures), m (minutes))
| Format de fichier | Réglage de l'enregistrement | 8 Go | 32 Go | 64 Go | 256 Go |
| XAVC S 4K | 30p 100M/25p 100M | 8 m | 35 m | 1 h 15 m | 5 h 15 m |
| 30p 60M/25p 60M | 10 m | 1 h | 2 h 5 m | 8 h 35 m | |
| 24p 100M* | 8 m | 35 m | 1 h 15 m | 5 h 15 m | |
| 24p 60M* | 10 m | 1 h | 2 h 5 m | 8 h 35 m | |
| XAVC S HD | 120p 100M/100p 100M | 8 m | 35 m | 1 h 15 m | 5 h 15 m |
| 120p 60M/100p 60M | 10 m | 1 h | 2 h 5 m | 8 h 35 m | |
| 60p 50M/50p 50M | 15 m | 1 h 15 m | 2 h 30 m | 10 h 25 m | |
| 60p 25M/50p 25M | 30 m | 2 h 25 m | 5 h | 20 h 10 m | |
| 30p 50M/25p 50M | 15 m | 1 h 15 m | 2 h 30 m | 10 h 25 m | |
| 30p 16M/25p 16M | 50 m | 3 h 50 m | 7 h 45 m | 31 h 25 m | |
| 24p 50M* | 15 m | 1 h 15 m | 2 h 30 m | 10 h 25 m |
FR
[Communications Bluetooth]
Norme Bluetooth Ver. 4.1
Batterie rechargeable NP-FZ100
Tension nominale: 7,2V = -
Objectif
FE 28-70 mm F3.5-5.6 OSS
120p 60p 60i 30p 24p
100p 50p 50i 25p
120fps 60fps 30fps 15fps 8fps 4fps
100fps 50fps 25fps 12fps 6fps 3fps 2fps 1fps
Assist Assist Assist S-Log2 S-Log3 HLG709 HLG2020
(CIPA: Camera & Imaging Products Association)
24M 20M 10M 8.7M 6.0M 5.1M
2.6M 2.2M
120p 60p 60i 30p 24p
100p 50p 50i 25p
120fps 60fps 30fps 15fps 8fps
4fps
100fps 50fps 25fps 12fps 6fps
3fps 2fps 1fps
Top Pos Pos stro Stn Off
Efcto de foto
[AF] [AFOFF
120p 60p 60i 30p 24p
100p 50p 50i 25p
120fps 60fps 30fps 15fps 8fps
4fps
100fps 50fps 25fps 12fps 6fps
3fps 2fps 1fps
Assist Assist Assist S-Log2 S-Log3 HLG 709 HLG202
Assist. vis. Gamma
![SONY ALPHA 6400 - [AF] [AFOFF - 1](/content/2024/11/202388/images/b06b876202f1ace751821e353c3ccf073056417808b81f16391005693a10aa88.jpg)
F-stop minimo: f/22 - f/36
Diametro过滤:55mm
24M 20M 10M 8.7M 6.0M 5.1M
2.6M 2.2M
120p 60p 60i 30p 24p
100p 50p 50i 25p
120fps 60fps 30fps 15fps 8fps 4fps
100fps 50fps 25fps 12fps 6fps
3fps 2fps 1fps
Velocidade de fotogramas para gravacao em-camera lenta/-camera rápida
![SONY ALPHA 6400 - [AF] [AFOFF - 2](/content/2024/11/202388/images/76f68470be57da38397b86c60f605b4578896e60baca082262d28333672f8645.jpg)
APS-C/Super 35mm
![SONY ALPHA 6400 - [AF] [AFOFF - 3](/content/2024/11/202388/images/a77c3fcd880e2f48fabb8d9cc05d21c5e2e95fe052fccf37cd8825f238d0ce8f.jpg)
Carregamento do flash em的方式来
VIEW
Ef. Definção Desl.

Illuminator AF
Flicker
Cintilação detetada


Executor [Foco Ponto]

NFC ativo (27)

Helpfunct. in camera

24M 20M 10M 8.7M 6.0M 5.1M
2.6M 2.2M
120p 60p 60i 30p 24p
100p 50p 50i 25p
120fps 60fps 30fps 15fps 8fps 4fps
100fps 50fps 25fps 12fps 6fps
3fps 2fps 1fps
Assist Assist Assist Assist S-Log2 S-Log3 HL6G 709 HL620
Gamma-weerg.hulp

Scherpstellen annuleren

AF-vergrendeling annul.
Spotfocus
[Spotfocus] uittvoeren

NFC actief (27)

Bluetooth-verbinding beschikbaar/Bluetoothverbinding nicht beschikbaar

AUTS SLOW REAR WL SW LSW REAR 80 SLW W
Flitsfungtie / Draadloos flitslicht / Rode ogen verm.
±0.0
Flitscompensatie
AF-S AF-A AF-C DMF MF
Scherpstelfunctie
中 中 中 中 中 中
Scherpstelgebied
JPEG RAW RAW RAW + J RAW+J
Bestandsindeling
中 SD
Lichtmeetfunctie
AWB AWB AWB
10 1 +2WB
7500K A5 G5
Toy Pop Pcs Rto Part R
Part HC 0FF
Foto-effect
AF AF ON OFF
Gezichtspriorit. in AF
PP1\~PP10 PP OFF
Beeldprofiel
1 2
[Bluetooth-communicatie]
120p 60p 60i 30p 24p 100p 50p 50i 25p
120fps 60fps 30fps 15fps 8fps 4fps
100fps 50fps 25fps 12fps 6fps 3fps 2fps 1fps
Assist Assist Assist S-Log2 S-Log3 HLG709 HLG2020
Asysta wy's. Gamma

Anuluj ostrość

233^44^55^
Film (format AVCHD):
SuperSpeed USB (USB 3.1 Gen 1)
Wi-Fi Protected SetupTM (WPS)/
reczna
ILCE-7M3 CnpaBOuHoepyKOBOdCTBO

HCTpyKU no 3KcNJIyatau (daHHa KnHa)

B daHOM pyKOBOdCTBe npedctaBHeHb HeKOTOpblc OCHOBhle yHKUIN.
YTO Kacaetc pyKOBOCTBa nO 6bIcTpOMy IyCKy, CM. "PyKOBoCTBO nO hauany pa6oTbI" (CTp.18).
"PykoBoDCTBO no hauany paobtib"
npedctabJIeT peDeBapuTeJIbHbe
npoUeIpyb c MOMeHTa BCKpbltna
yNAkOBKN Do cnYcKa 3aTbOPa Idn
neBPOR OCHMka.
BctpoeHHa cnpaKa

[BcTpoeHHaC npabka] noka3bIbaet NocheHnnyHKTOB MeHIO Ha MOHTope KaMepbl.
BbMOKeTe b6IcTPO NOJUHTb
HΦoPMAuIO BO BpeMcBcEMKn.
DJIa NcNoJIb3OBAHnA OYHKcIMn
[BCTpoEHnA CnpaBaK]
HEKOTOpBle HAcTPOkN DOnJIhBi
6bItb CSeNaHb 3apaHee.ДЯ
NOJUChENy NOpOBohIX CBeDeHn
CM.“BCTpoEHnA CnpaBaK" B
CnpaBOuHOM pyKOBoDCTBe.
Приимechаши по Исторistically KaMepbl
BMeCTe C 3Tm PA3dELOM TAKKe cm."MeBPl nepeOcTOPOXHOCTn" B CnpAboHOM pyKOBoCTbe (CTp.2).
Y3bIK 3KpaHHo INHdNkaun
BbMoKTe Bb6Pab Yb3bK, OTo6paKaembHa NkPaHe, C NOMOuBo MEHO.
PpmeaHn no o6paueHnO n3deJInem
Данная камера Имeelпьлі - Вагоctойко Исноненье, Не Heяльетс BODOHENPOHUNaEMOИnpьЛБЕнEOHINUdAEMO.
- Пи И снолььовани объektва
C рпводнblим ЗУМОБ удыт
Oсторжны, Утосы Baши пальси
Илл дуггпе подmetы He Был
Зашемленьи В объektve.
- Ecnn KaMepa He NcnoIb3yetcra, Bcerda npkrpeJnIe pepeHIOO KpbIuKy oBeKtINBa IINn KpbIuKy Kopnyca.ДЯnpedTbpaUeHnI NaopaDAnHn PbIIn IINn rpr3N BHyTpB KaMepbl YdAInTe PbIb C KpbIuKn Kopnyca nepepnpkrpeJIenHem eK KaMepe.
He octabnIte o6bektnb IIN BIDONCKATEJB NOD BO3eJCTBnEM CINbHORO INTOCHNHO CBETA, HApnpimep cOnHeHOro CBeta, B PezynltaKe KOHNcAunnHa O6bektNB 3TO MOKET PInBecTn KIOABLeHIO DbIMa, BO3rOpAHIO IIN HeNCnPABHOCTH BVHTPn KOpNyca KAmepbl IINI O6bKTNA. ECLN HUxHoO OCTaBt b KaMepy ND BO3dEhCTBnEM INTOCHNKA CBETA, HApnpimep, COJIeHOrO CBETA, PnIKPenITE KpbIiKy O6bektNa K O6bektNY.
-Пи CBemke c noCBeTkoI paCnoJaraiTeB TaK, YTO6bI coNHe z HaxOJIIOcB doCTaTOH0 DaJIeKO ot YrTa o63Opa. B npOTuBHOM cnUyae coOnHeNb CBEt MOKeT cFOKycnPOBaTbcB HByTpri KaMepbl I pINBecTI K NOABLeHIO bIMa INI BO3rOpAHIO. Daxe ecNI coJInze HaxOJITcER HeMHoro BV CTOPHOE OT YrTa o63Opa, 3TO BCE eIe MOKeT pINBecTI K NOABLeHIO dIMa INI BO3rOpAHIO.
- He Hanpabria Te Obektnb HnocpeDCTBeHNO Ha LyuN, HanpimEp Na3epHbIe JyU. 3To MoKet NobpeTb DaTchN nO6paJaeHHa npBecTn K HcncPabHOCTn KaMepbI.
He cmOTnTe Ha cOnHeuHbI CBET NIN CUNlbHbI MCTOuHInK CBETA Uepe3 ObKeTnB, KOrDa OH OTOCoeUHHe. 3To MoKet PnpBcTeN K Heo6PaTmOMy NOBpExJDeHIO rla3 NIN CTaTb PrnHiHOH HeCNpRaBHOCTN.
He octabJnTe KaMepy, npNJaraeMbIe npNHaJnEJXHoCTu nnKapTb nAmTn B MeCTe, DOCTynHOM dI MaJeHbKInx DetTe. Nx MoKHO cnyauHIO npOrJIoNTb. ECn 3TO npOImzOJdET, HeMeJeIeHOO bpaTtecb K BpaCy.
RU
BbInoJIHeHne [ΦOpMaTnOBoTa] nnn [YdAaNtB] Ha kamepe nn KOMMbIbOTE MoKTe H Ye dAaNtB OINIOHOCTBO DaHbIe C KapTb NaMrtn. PnnpereDae KapTb NaMaTn DpyuMn Liuam peKoMeHdyetc YdaAaTb DaHbIe NIOHOCTbO C NOMOuBo npOrpAMMHorO oEcbneHEny IJy UdaJeHnaDaHbX. Pn TynlNaCn KApTb NaMaTn peKoMeHdyetc pa3pyuHTbe ee fN3uYeCKn.
PpimMeaHnno 6eCnpoBdoHn loKaJIbHOcTn
B cnyae noteprn nn kpaXn KaMepbl
Sony he hecet OTBeTCTBHeHOctn 3a
ytpaTy nn yueep6, npuNHeHHb
HecaHKUHOHPOBaHHbIM
DOCTYOM nn NcPb3OBAHnEM
3aperCTpnpoBaHHbx Ha KaMepe
TOeK DoCTyna.
PpimMeyaHnO tHocnteIbHo 6e3oNaChOCTn pni NcNoJIb3ObaHn 13dJIeN b6ecnpoBODHO JOKaJIbHO cTeH
Позбовтесь O TOM,ЧТобьВсгда ИСПОЛБОВТБ 6БЗОпАСНУБ6БСРБОДИНУLOКАЛБИNOСТБДПЕДOTВРаSUЕнINB3LOMA,DОCTУNA 3ЛОнамЕрнEHbIX TpeTbIXNIII INI DpyrNIX HAPUSEHINCITEMbl 3aUNTbl.
- Baxho yctaHOBNbT haCTpoiKn 6e3oNaChOcTN pNn cNoJIb3OBaHNb 6eCnpoBdoHnI oKaNbHO CTen.
- Ecni np6bIeMa 6e3oNaChOCTn BO3HKnJa PO npuHMe NEbblOnHeN Me PnpEOTOPOXHOCTn NlB CBA3n C KaKIMN-lIb6 HeN36ExKbHMn O6cToTeJIbCTBaMn Pn INpOlb3OBAHN 6ecnpOBoHDn IokaJIbHO CETn, Sony He Hecet OTBeTcBeHHOC7t 3a YtpaTy nUyep6.
Kak BpeMeHHO OTKJIouHtB cyHKcHn 6ecnpoBHO cETn (Wi-Fi, n.t.n.)
HaxoJbC hHa 60pTy cAmOJeTa n T.I., MoKHO BpeMeHNO OTKIIOuHTb BCE fYHKUIM 6ecnpOBDoHn CeTn C nOMOuBIO [PekmNoJIeTA].
Cetebo shnyp
ДяnoskynateJIeB
Belenko6pnTaHnn,InpnaHdnn
MaJIbTe,KnIpe n CayIOBcKoN
ApaBnN
IcnoJIb3yIte cTeBoiu shyp (A).
U3 coo6paXeHn 6e3OaNacHocTn
paanoo6opdyoBAnHnILCE-7M3
COOTBeTCTByET TexHnueckOMy
perlameHTy paIIOOBOpUOBAHnIu
TeLeKOMMyHnKaLNoHnHO KOHeuHOrO
(TepmHaJIbHOrO) o6OpyDoBaHnI.
COOTBETCTBnIOCTyneH B INHTepHeTe
no aDpecy:info@sony.ua.

001
PpHmEuaHnO tHocTeJIbHo DaHHOro pyKOBoDCTBa
Данhoe pyKOBODCTBO OTHOCITcK HeCKOJIbKIM MOdJIaM,
NCTaBJIeMbIM Cpa3JIuHbIMN O6beKtNBamN.
Ha3BaHneMoJeN BapbnpyETc
B 3aBnCmOCTN OT npuJaFemoro
ObbektBa.ДocTyHnaMoJelb BapbnpyETcB 3aBNCUMOCTN OT
CTpaH/perHOHOB.
PpIaTaEeTcKoBcEMMoTeJMaM
Kamepa (1)
Aaantep nepemehnhoro toka (1) FOpMa aandaTepa nepemehnhoro TOKa MOKET OTNIuYaTbCBA 3aBcIMMOCTN O T CTApaHbI/perNoHa.
- CTeBoiuHyp(1)*

* B KOMPJIeKT NocTABKn KaMepe Bo MoXeT BXOJNTb HECKoJIbKO CeTeBbIX SHyPob. IcNoJIb3yIte UHpy, COOTBETCTByIOuIli CTpaHep/pernoHO npebbAbaHn CM. cTp.8.
- AkkymyIaTOp NP-FZ100 (1)
- Ka6eJb Micro USB (1)
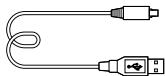
-Плесевий ремень(1)
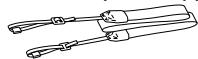
Kpblika Kopnyca (1) (pnpknpeHa K kamepe)
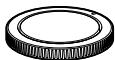
Kpblika pa3bema (1) (pnpknpeHa K kamepe)
Hartna3nK okyra pa (1) (npnkpenHeHa K kamepe)
-Интукцию Кслуаци (1) (dahnoe pykoBOcTBO)
CnpaBoUchnK(1)
ILCE-7M3K
RU
- 3ym-06bektNB FE 28-70 mm F3.5-5.6 OSS (1) (BkIouyanepeHIO KpbIuKy o6beKTnBa n 3aDHOIO KpbIuKy o6beKTnBa)
-Блениа oběektúna (1)
0603haeHne yacte
16 SLOT 1 (CLOT KapTbI naMaTn 1) (20)
IyHKT 1: BCTaBka aKKymyIaTopa B KaMepy
1 OTKpoIte KpbIshky aKKyMnyaTOpHoro OTceKa.
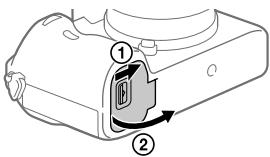
2 BCTaBbTe aKKymyIaTOp, Haxmma pbyar 6IoKnpoBKn KOHcOM aKKymyIaTOp da To Tex np, noka aKKymyIaTOp He 3aueJKNHeHa MeCte.
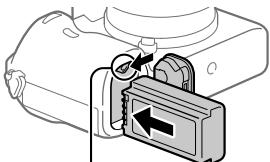
PbUar 6JIOKINPOBKN
3 3aKpoIe KpbIkwKy.
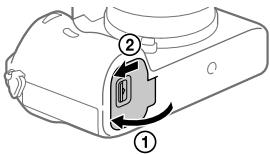
Y6eIITcB TOM, YTO INHINKATOp
IOCTyNa (CTp. 12) He roptN,
BbIKIOHTe KaMepy. 3aTeM CdBINbTe
pbUar 6JIoKNpOBKn N3BJIeKNTe
AKKYMnIATOp. BydIte OCTOPOXHbI,
YTO6bI He yPOHnTb AKKYMnIATOp.
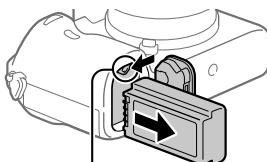
PbIur6JIOKIpOBKn
Пункт 2:Зарядka AkКуМлЯТораВTOВрмя,КOrДа OH BCTaBLeH B KaMepy
1 OTKHIOHTe nHTaHne.
2 Pookluoyte KaMepy C BCTaBJIeHHbIM aKKyMylrTopoM K aanTepy nepemehHoro TOka (npnilaraetc) c nOmoIbu Ka6eJy USB, N noKluoyte aanTep nepemehHoro TOka K CETeBOJ po3eTke.
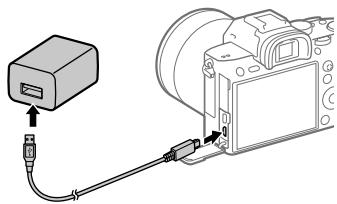
Jamnoka 3apdkn Ha KaMepe (opahkeBa)
Topnt:3aprka
BbIK:3apJa3aBepSeHa
Muraet: Oun6ka 3aprdkn nn 3aprka BpeMeHHO npnoctahOBJIeHa, nocoklbky kamepa haoDITc8 3a npedeJAMn HndIeKaUero TEMpepaTpyHOro duaana0Ha
Bpem3aepn(noHna3apnKa):npnbIeHTbHo 285 mH.(npn 3apKe npHOctbpo pao3paJeeHHoro aKKymyTotaopa npTeMpePaType 25^
- Пи IncnoIb3OBAHn COBepueHNO HOBOr oAkkymyIaTopa nnn
akymyIaTopa, KOTobny He INCnoIb3OBAJc DaNITeNbHOe BVPemr,
nHdNKaTOp 3ap4Kn MoKet 6bICTpo MmraTb npu 3ap4Ne kAkkymyIaTopa.
EcInn 3To pOn3oUNo, n3BLeKne To AkkymyIaTopa nIn OTOeDINHTe Ka6BeJ
USB ot KaMepb, a 3aTeM BCTabte erO ChOba Iry nOBtropn 3ap4Kn.
- 063aTeNbHO NcNoJIb3yIe TOJIbKO opUInHaJIbHbIe aKKUMyJrTOpbI MapKIN Sony i anTepbl nepemehHoro ToKa (npunlaeraTc).
- Истору щите Кабел USB (прUILARAEТСА) ил стандартуль Кабел USB.
- Пиюлбовани Кабеля USB Type-C Врем зараздк nbудт takIM Зe.
RU
IyHKT 3:BCTaBka KapTbI NaMaTn
IoppoBHe BcBeHnO KApTAX PAmrTn, KOToPbE MOKHO INCIOJIb3OBaTb C daHHo KaMePo, npuVeDeHb Ha CTp. 40.
1 OtkpoTe KpbIshky Oteka KapTbI nAmrtn.

2 BCTaBbTe KapTy SD B CIOt 1.
Cnot 1 (HnXnn): POnIepxNbaeT KapTbS SD (coBmecTmblc c UHS-I n UHS-II)
Cnot 2 (BepxHn): POndEpeXnBaet KapTbI SD (coBmecTmMbIe c UHS-1) n Memory Stick PRO Duo
Cnot 2 Cnot 1
PacnoJIOXINB KAPTy NAMrTc 3a3y6peHHbIM YrIOM TaK, KaK nOKa3aHO Ha pncyHKe, BCTaBtE ee do UeJIuKa.
- Bby moKTe n3MeHЯb CLOT KapTb I naMaTn IaI NcNoJIb3OBAHnI pyTeM
- Bby6opa MENU → (HacTpOJa) → [HacTp. 3aInc. HocuT.] → [PpInOp. HocuT. 3an.]
Cnot 1 nCnoJb3yEtc B yCTaHOBkax No yMOnJaHnIO.
- IcnojIb3yIte cIOT 1 npn IcnoJb3OBAHm nToJIbKO OJHO KApTbI SD.
IncnoJIb3yIe cIOT 2 npn IncnoJIb3OBAHm Memory Stick. B bTOM cIyae yCTaHOBITE [PnpOp. Hocnt. 3aI.] B [rHe3do 2].
3 3aKpOte KpbIkwKy.

Cobet
ПиИСПОЛБЗОВАнМКAPТБЯРМТИСКAMЕРОВЕРБВИЙ рAZ peKOMeHДуETСАТФОМАТЮРВАБКAPТУСПОЛБИЙКAMЕРБДЯбLOЕ CTABINBJHOI pa6OTbI KAPТБЯРМТИ.
Приимechанинe
- He BCTabIaIe Memory Stick B cnot 1. 3To moKTe npNBecT K HnCnpBaHbOcTn.
ДлгИЗВLEЧЕНКAPТБI NaMЯТN
OTkpoIte KpbIshky OTeKa KaTbI naMaTn. Y6eDiNTeCb B TOM, YTO nHdNkATOp DoCTyNa (Ctp. 12) He rOpNT, a3aTeM OJHOKpaTHO hXakMTe KapTu NaMaTn IJNe ee n3BJIeEHNI.
7 NOBTOPUte DeiCTBnI NyKTOB 5 n 6 dIy yCTaHOBKn dpyrnx NyKTOB, a 3aTeM BbIbepuTe [BbOd] n HaxMNTE no ceHTpy.
Cobet
- YTO6bI c6pOcTb HAcTpOuKn DaTbN BpeMeHn, nCNoJIb3yIte MENU.
PpimmeuHne
B DaHNoI KaMepe HeT FyHKUIN BCTaBKn DaTbHa CnHMKn. Bbl MoKeTe BCTaBnTb DaTy Ha CnHMKn, a 3aTeM CoXpaHnTb N paCneuTaTb IN C NOMOuBo PlayMemories Home (ToIbKO dIra Windows).
IyHKT 6:ΦOTOCbEMKa BpeXmme aBTO
"CnpabOuHoe pyKOBOcTBo" (ctp.2).
YctaHOBka PlayMemories Mobile
Длг соедиени Камерblmсмртфога тpeбуетс PlayMemoriesMobile.
Епг пчложенie PlayMemoriesMobileУхе установлени Ha
смртфонe,убдпесь,чToОнообн oblениdo постдени Верси.
Длг поочenii NaDpoRobhix CbeDEDnO PlayMemoriesMobile
nepeiДNTe Na CTpaHnUy noДпэржkn (http://www.sony.net/pmm/).

PlayMemories Mobile

PpimmeaHne
YtOb6IbnCNOB3OBaTbФyHKUIO 6JIIXxHei BeeKoHTAeTHo CB3n KaMePbI B OndHO KacAHne, Heo6XoDM Android-cMaprFOH mII nnI pHaIWeT c NODepKKoB 6JIHXNeH BeeKoHTAeTHo CB3N.
- Pa6o7aФyHKuN Wi-Fi, npeCTabNeHbIX B daHHOM pyKOBOcTBe, He rapaHTnpyETca Ha BCex Cmptfohax I nlaHwetax.
-Функци Wi-Fi 3toi KaMepbI HeNoCTyHbI pI ni PoKnIoueHn K 6ecnpobOAnH cTe n oBzero noIb3ObaHn.
B 3abnCmOCTN ot Bercn 6dyuXx O6bHOBLeHn, 3KcPlyaTauOnHbIe npOeDpyb nE KpaHbIe NdKnauCaun MoYr 6bIt bNMeHeHb 6e3 npDeBaPntelbHoro YBeDoJIemHa.
3aHnCb HOpMaun O MeToNolOKeHN Ha 3axBaueHHbIe N3o6paKeHn
C nomoubIO PlayMemories Mobile moxHO noJyauT bHnΦopMauio o MeCTOnoIooXeHNn u3 noKJIoueHNHO cMaprfoHa (Yepe3 coeINHeHne Bluetooth) u 3aNNcBAtBaT ha 3axBaueHNbIe N3O6paXeHN.
RU
BVeJEHnE B KOMNbIOTepHoe nporpaMMHoe o6ecneHHe
PpeIaeraTcIeDyUoOeKOMNbIoTePHeOp npOrpAmMHOe oecneueHene IaIpaIupeHnBaIHX BO3MOXHOCTeB BTO/OIIOeO.IOnyUHTe DOCTyn K ONDHY n3 cIeDyIOUnx URL-aIpeCoB C nOmoIbU INTePHeT-6pay3epa, a 3aTEM 3aRpy3InTe npOrpAmMHOe oecneueHne, cIeDyur HNCTpyKUmaH NaKkpeAe.
Ecn Onda n3 3TNx nporpaMM yXe yCTaHOBJIHa Ha BaWem KOMNbIOTepe,
OboHbNTe ee do noocJeHneBepcnn nepei nCnoNb3OBaHNm.
Windows:
http://www.sony.co.jp/imsoft/Win/
Mac:
Bam Heo6xOIMo UCTaHOBuTb PlayMemories Home, uTo6bl NmnpTnpoBaTb BInDe03aPiNcXAVC S nIi BInDe03aPiNc AVCHD BV KOMlbIOpTeP.
Bb moKeTe nOJyUHTb IOCTuK Be6-caI TY 3aRpy3KN HeIOcpeIcTBeHNO CO cIeDuIooero URL-aIpeca:
http://www.sony.net/pm/
CocToHnE KApTbI NaMaTn (20,40)
100
OCTaBHeeC8 KOJInueCTBO OIOCTYINbIX DJIa 3aNcU CNHMKOB
13
Даннебацик /КоличесвО OCTaBшХСДЯЗИСN CHMKOВ
3:2 1
ΦopMaT ΦOTOCHIMKOB
24M 20M 10M 8.7M 6.0M 5.1M
2.6M 2.2M
Pa3mep n3o6paKeHHa ΦOTOCHMKOB
RAW RAW
3aɪnch b φoːpmaTe RAW (CxətB/HeCxAtB)
X.FINE FINE STD
KaueCTBO JPEG
XAVCS4K XAVCSHD AVCHD
ΦopMaT BnDeoΦaJIOB
100:60:50:25:16:FX:FH:
YCTaHOBKN BnEo3aIINCU
120p 60p 60i 30p 24p
100p 50p 50i 25p
Uactota Kaipob Bnideo
100 60 50 25
16 1px
3anncb npokcn
120fps 60fps 30fps 15fps 8fps
4fps
100fps 50fps 25fps 12fps 6fps
3fps 2fps 1fps
Yactota KaDpoB dIa3amdeHnHo/yckOpHHoCBemKn
APS-C/Super 35mm
BbInonHaeTc3apdKa BcnblkN
VIEW
OTo6p.napam.BblIKJI

IOnCBeTka AF
Flicker
ObnapykeHo MuraHne
(FF)
SteadyShot BvKn/BKn,
Pteydnpexdene o Bvnbaqun
Kamepbj
()8mm 8mm
Assist Assist Assist S-Log2 S-Log3 HL6709 HL6208
Под��жka Gamma

OTMeHaΦokyca

OTMeHa CneJaIero AF
TooyhnyoKyc
BbIOpHHeHn [ToueuHbI oKoc]

NFCaKTUBHa (28)

Bluetooth-coeHNHeNne dOCTynH0 / Bluetooth-coeHNHeNne HeNoctynH0

AF-S AF-A AF-C DMF MF
PeximΦokycnpob.

06JaaTb oKycnp.

ΦopMaT φaɪla

Pekimn3Mep.

7500K A5 G5
BanaHc 6eIoro (aBOMATUneCKn, npedyCTaHOBLeHHbI, aBOMATUneCKn NOd BOIOJ, noJIb3OBAteJIbckn, ZBeTOBaJ TEMpePAtypA, ZBeTHoN fInlbTp)
DRD DDB OFF AUTO AUTO
OnT.I-DnAn./ABTo HDR

$$ + 3 + 3 + 3 $$
TbOpueck. CTnIb/ KOthpaCTHOCTb, HacbIeHHOCTb n pe3KoCTb

3ΦΦeKt pucyHka
AF AF ON OFF
Pnpopnt. nuaB AF

IpoΦnIb n3O6paK.
1 2
Ppnoj. Hocnt. 3an.
5 YCTaHOBKn INHnKaTopa φokycnpOBKn/3Kcno3n
()
INdikkaTOp oKocuropOBKn
1/250
BbIepeKka
F3.5
3naeHne ndaΦpaMbl
#
Korpekua 3Kcnozuiu Puyno pexum n3mepenna
ISO400 ISO AUTO
YbCTBNTeJIbHOCTb ISO
#
[3NeKtpoHHbI BnOONcKaTeJIb]
TIN:3JIeKTPoHnBb BUNOuCKaTeJIb 1,3cm (TIN0,5)
06IIeO KOJIeNcEbTO TOpEK: 2359296TOeK
YBénuéHne: pπbIa3. 0,78× cObéKtBOM 50 MM Ha 6eCKOHeuHCTn, -1 M
Tocka 63oopa: pnp6n13.23 MM OT OKympa npnp6n3.18,5 MM OT pamkn OKympa Ha-1 M-1
Peynpovka dnoontpa: ot -4,0 M-1do +3,0 M-1
[MOHUTOP]
7,5 cm (Tyn 3,0) xeme ynpableny TFT, cecohpna naneh
OObuie KOJIUNCTBO TOUeK: 921600TOeK
[YnpabJIeHne 3KcNo3nueNe]
MeTod 3KcNo3aMepe:1:200-30HbIy OLEOHcybIe 3KcNO3aMeP
[Pa3beMbblBbOa/BblBOa]
Pabem USB Type-C: SuperSpeed USB (USB 3.1 Gen 1)
Pazemulti/Micro USB*: Hi-Speed USB (USB 2.0)
*ПдержиBaet Micro USB-COBMECTMble yCTpoIcTBA.
HDMI: MinkporHe3do HDMI Tuna D
Pa3bem (MVKPOΦOH): 3,5-MMCTepeoΦOHueckoe MHNH-FHe3D0
Pa3bEm(HayuHnKm): 03,5-MMCTepeofoHueckoe MHN-HThe3D0
[06uee]
Model No. WW541200
HOMHaJIbHbI BxOJ:7,2B-3,2BT
PaOoYaTmemepatya: OToCDo 40C
Tempeyata xpaheHn: Or-20C7o55C
Pazmepbl (UJ/B/Γ) (npn6JIu3.): 126,9 × 95,6 × 73,7 MM 126,9 × 95,6 × 62,7 MM (OT yPKoRTKIN DO MOHITOPa
Bec (B COOTBETCTBUN C CIPA)
(πριδλίπεις):
650 r (ΒΚΙΝΥΑγακΚυΜγλητΟρ, καρτύ SD)
[Becnpobodnaj lokalbna cetb]
Пдэджбаваимь Формат: IEEE 802.11 b/g/n
PonocacT:2,4T
Beonacohctb: WEP/WPA-PSK/WPA2-PSK
Cnocob noKJIOUeHINIA: Wi-Fi Protected SetupTM (WPS)/ BpyNuHyo
Cnocoboctyna:INHpactpyktyphnb pekmn
[NFC]
Tin tera: B cootbetCTBn C NFC Format Type 3 Tag
[CoeunneHnblaTeoth]
CtauIaapt Bluetooth Bep.4.1
Pionoca tactor: 2,4 Γu
AanTep nepemehnHO TOka AC-UUD12/AC-UE12
HOMnHaNbBbN bXoD: 100-240 B\~,50/60 Γu,0,2A HOMnHaNbBbN bXoD:5B---,1.5
AkkymytaTop NP-FZ100
MOnHAnBaHoe HaprJaKeHne: 7,2 B---
ObekTNB
FE 28-70 mm F3.5-5.6 OSS
(npunaraetcK ILCE-7M3K)
Φokychoe paccToHnHe:
28 MM - 70 MM
Ipynnbl-3JemeHbI oBeKTHBa:8-9
YrOJ 630pa: 75^ - 34^
MIMMANJIbHoe FOyCHOePacCToTHNe*:0.3M-0.45M
- MnHIMMaB Hoe φokychoe pacCTOHaNHe InpdctabJraet co60i HanMeHbIeepacCTOHaHne OT DaTnKaI N3OpbaxeHnI Do o6bKeTa.
MakcimmaIbHoe yBelenueHne:0,19x
MnHmAbHoe DeneHeNe DnaΦparmb: f/22-f/36
Диаметрфпльта:55mm
O cOBMeCTHMOCTH fOpMaTOB n3o6paXeHH
Данная камера cootbetCTBye
Универсаньому сандарту DCF
(Design rule for Camera File system),
Установлениму JEITA (Japan
Electronics and Information
Technology Industries Association).
Bocnpoun3BeHeHne n3o6paJxehn, 3aIncAnHHbX BaWe Kamepoi, Ha dpyrom OobpyOBOAHn I BOCnpoun3BeHeHne BaWe Kamepoi n3o6paJxehn, 3aIncAnHHbX INI OTpeAekTIPOBAOHHbX Ha dpyrOM oobpyOBOAHn, He rapaHTnpuyETc.
TobapHbIe 3HaKn
Memory Stick n yBnIOTc TOpaRbIMn 3HaKaMn NINN 3apeRNCtPnpoBaHHbIMn TOpaRbIMn 3HaKaMn Sony Corporation.
XAVC S n XAVC S RBAJIOCTCA3peRnCTPnpObaHHbIMTOBapHbIMN 3HaKaAMN Sony Corporation.
"AVCHD"илоготи"AVCHD"ЯлгOTСТ ТоварыМЗнakamPanasonic Corporation nSonyCorporation.
Mac JIJIETcT OTOBAPHbIM 3HAKOM Apple Inc., 3apernCTpnpoBAHbIM B CoeINHeHHbIX IITatax AmePknu IN dpyrIX CTpaHAX
- IOS RNAIETCA
3aperNCTPINOBAHHBIM TOBAPHBIM 3HAKOM INI TOBAPHBIM 3HAKOM Cisco Systems, Inc.
- iPhone i iPad yIbIaIOTc
- TobaHbIMi 3HaKaAMi Apple Inc.,
- 3apeNtCtpnpoBaHbIMi B CLJAm i
- dpyrWx CTpaHax.
- Blu-ray Disc^TM in Blu -ray™
- YBJIHOTC TOBAPbIMN 3HaKaMn
- Blu-ray Disc Association.
DLNA i DLNA CERTIFIED RJIJIOTcT OTabHbIMN 3HaKaMn Digital Living Network Alliance.
- USB Type-C™ n USB-C™
- RBJIAIOCTO BabhMy 3HaKaMn USB Implementers Forum.
- Jlorotin USB-IF SuperSpeed USB Trident Webnet 3apereNCTpnpoBaHHbIM TOBAPbHbIM 3HaKOM USB Implementers Forum, Inc.

Dolby, Dolby Audio and CMBON
Довиного ДялгOTсТ ТоварыIMN
Знakам KMпанин Dolby
Laboratories.
- TepMNbI HDMI n HDMI High-Definition Multimedia Interface n LorotnH HDMI raJIaOTcT TOBAPbIMn 3HaKaMn IIN 3apeRncTpnpoBaHHbIMn TOBAPbIMn 3HaKaMn HDMI Licensing Administrator, Inc. B CoeINHeHHbx IITatax n dpyrnx cTpaHax.
- Microsoft Windows KBJHOTc3aerncptpnoBaHNbIMnTOBaPbIMN 3HaKaMn NINTOBapHBIMN 3HaKaMn Microsoft Corporation BCoedIneHHbIX ⅢTatax AmepuKn n/NNIN Bdpyrnx CtpaHax.
Логотин SDXCявлаятся Товарным
ЗнakOM SD-3C, LLC.
- Facebook и norotin "f"
- JBIAIOTC TOBAPbHMn 3HaKaMn
- INN 3apeINCTpnpOBaHbIMn
- TOBAPbHMn 3HaKaMn Facebook, Inc.
Android n Google Play
YBJIaIOTc TOBaPbHbIMn 3HaKaMn
NIN3aPeIcTpnpoBaHbIMn
TOBaPbHbIMn 3HaKaMn Google Inc.
YouTube n lorotin YouTube JIJIOTCT TOBaPbHIMn 3HakAMn ININ 3aperiNcTpnpoBaHhbIMn TOBaPbHIMn 3HakAMn KOMNaHHn Google Inc.
Wi-Fi, norotnn Wi-Fi Wi-Fi Protected Setup yBnIOTc3apeNCTpnpoBaHbIMn TObAPbIMn 3hAkAMn IJN ToBaPbIMn 3hakAm Wi-Fi Alliance.
MeTka N YABJRETC TOBapHbIM 3HAKOM NII 3aERNCTPnPOBaHHbIM TOBAPbIM 3HAKOM NFC Forum, Inc. B CoeINHeHHbx IITatax Amepnu IN B Dpyrnx CtpaHax.
- TekCTOBbl CMBON N ILOROTINbI Bluetooth® JBLJIOITc3 3apeHCTpnpOBAHHbIMN TOBAPbHMz3HaKaMn, npHnAdJIeXaUIMN Bluetooth SIG, Inc. n IIO6oe nCnONb3OBaHne TAKNX 3HakOB Sony Corporation oCyueCTBIAeTcno NmUeHN3N.
- QR codeяльецьтаятоварызнakом Denso Wave Inc.
Kpome TOrO,Ha3BaHnIcCTEm nN3dJIyN,INCNoIb3yEmIbe B DaHHOM pyKOBoIDCTBE,RAJIYOTcR, OobIyHO,TOBAPbIMn 3HaKaMn INI 3aERNTCPuROBAHbIMn TOBAPbIMn 3HaKaMn IN COOTBETCTByUoInx pa3pa60TCHIOKOB INI pON3BOIDTENeI. OJNaKo 3HaKn TM INI @ INCNoIb3yOTcR He BO BCEx CInyuaX B DaHHOM pyKOBoIDCTBe.

InfoLITHIUM


MEMORY STICK

CLASS


CLASS
RU
HBM
HIGH-DEFINITION MULTIMEDIA INTERFACE
AVCHD

XAVC S

Bluetooth
O npnklaHOM nporpaMMHOM o6cepehen GNU GPL/LGPL
B coCTab n3deleny BXoDIT nporpamMHOe oecneueHne, coOTBeTcTBUOuee yCLOBnAM GNU General Public License (daJe e imHeYETcKaK"GPL") uLI GNU Lesser General Public License (daJe imHeYETcKaK"LGPL"). 3TmM YBEdomJIaETcR, UTo Bbl IMeete npabo DOCTyna, MOiNfKnAuzin n paCnpocTpaHENI cXoDnHOro KODa DAHNORo nporpamMnHOro oecneueHnHa yCLOBnAx, orObopeHHbIX B npinlaraembIX IuIeH3nx GPL/LGPL. IVxOHDhBI KOd paCnpocTpaHaeTcra uepe3 CETb INHTepNet. DJIraERO zarpy3kN iNcNoJIb3yute CNeJyoIINURL-aDpec. http://oss.sony.net/Products/Linux/ Haua KOMPAnHnI npocnt He obpaatbcrno nobody codepxahnI INxOHDHOKOda. IInceH3NI (Ha anFlnIKckOM RaBike) 3aIncAHI BO BVHTpeHHeN pAmrtn n3dEJIa. YctanOBtte CoeiHHeHne Mass Storage MekJy n3dEJIeM NcMbIOTePOM, YTObI npOcTeB TeKT IInceH3NI B nAnke "PMHOME" - "LICENSE".
DOnONHnTeJIbHaN HOpMaIaIe O daHOM nIeJenn N OTBETbl Ha aCTO 3aDaBaEMbE BONpCbI MOKHO HAITn Ha Hauwem Be6-caTe NoIdepKKn NOKynteIe.
http://www.sony.net/
RU
BnKOpNCTOByTe 5Hyp XnBLeHnH (A).3aJna 6e3neKn 5Hyp XnBLeHnH (B) He npia3NaueHn Dnla HabeJeHnx BnIe KpaI/HperIOHib, i Tomy Ioro He CnIi BnKOpNCTOByBaTn TaM.
1nJa KniEHTIB B IHxNs KpaIHax/ periohax CC
BnKOpNCTOByTe 5Hyp XnBLeHnH (B).
(A)
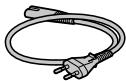
(B)
CnpabXhIM CoH KopnopeuH 3aBnIe, IIO TnI padioo6laHaHAnHH ILCE-7M3 BiIDNOBIAe TEXiHuHomy perIamEnT y paoioo6laHaHnn i TeLeKOMYHikauiHoro KInCeBOrO (TePMHaJIbHO) o6laHaHnn. POBnH TKCT deKnapaui npo BiNDIOHicb doctynnbl HInTpHeti 3a TakoIo aDpecoU: info@sony.ua.

PnIMITKu zboRo noci6Hnka
Lcienoc6HnK oxoJIIOeIekJIbKa MoJeJ, kI KOMIIeKTyIObCp3HNMI O6'KTINBAMi. HaBaMoIeI 3aJEnTb BiD o6'KTInBa, 0 DoJIoTeBc. HApBHcTb MoJeI 3aJEnTb BiD KpaIH/periHOy.
| Назва моdeni | ОБ'ЕКТИВ |
| ILCE-7M3 | Небае tbся |
| ILCE-7M3K | FE 28-70mm F3.5-5.6 OSS |
THi3do 1 BKNOPICTOBYeTBcY HaJALWHTYBAHHX 3a 3AMOBUByAHHm. JaKIO HanaaHTyBaHH 3aJIIMaTaBc8e3 3MiH i BKNOPICTOBYBaTMETbCra LiIHe OHa KaPa Ta Nam'rTi, BKNOPICTOBYe THi3do 1.
Kkuo BCTaBtu y rHizdo 2 iHsU kyapTu nam'ayi,Ha oNDbI kaTn nam'ayi MoXHa OndHocHo 3aNcCyBaTu OndhakObi a60 p3Hi 3o6paKeHHa (ΦotorpaΦii/BiDeo) ([Pekm 3aNcy] y MeHIO [HaJaHT.3aNc.Hocia]).
UA
Kpok 4: BCTaHOBLeHnO6'kTnBa
1 3HIMITb KpMkky Kopnyc y 3 foToanapata i 3aDnHO KpMkky 06'KtNBa.
3aMHHoTe 06'ekTMBuNko iY cepeOboNsi, BInbHOMy BiD nIy, uO6 yHnKHytn NotpAnJnHn nIy a6o bpyd BCEpenHy fotoanapata.
-ПисlaЗавершенизOMК peKOMeHnycTbCBAtAHOBNTI nepeDnIO KpUShky O6'kTnBa.
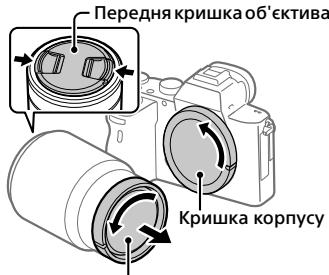
3aHkpnka 06'ekTnBa
2 BCTaHOBIb 06'KTHB, BnpiBHBw nDi 6iJI nO3NaUKN (nO3NaUKN BCTaHOBHeHH) Ha 06'KTHBi Ta foToanapati.
- ⅢO6 3aI06iTnNotpAIIHnIO nny a6o 6pyu y fOtoanapat, TpMaJTe fOToanapat O6'KETNBOM yHn3.
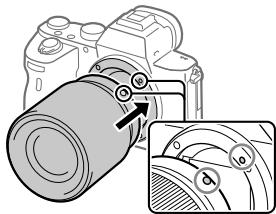
3 3nerka npntnckaoun o6'ekTnB do foToanapata, nobepHiTB o6'ekTnB y HanpMky CtrpiKn,doKn BIn He Klaune Y 3aΦiKCOBAHOMy nIoXKeHHi.
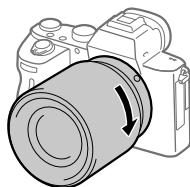
Ppimitka
BCTaHOBIIIOUH O6'KTKVB, TpIMaIte Ioro pIBHO i He IOKlaJaTe HaMipHnx 3ycnIb.
- He haTnCKaTe KhoNky fikCaTopa 06'ekTnBa nID yac BCTaHOBneHHra 06'ekTnBa.
Дяи ВИКОПЕСТАнHA 66'EkTNBA 3 A-нepexiДнИКOM (npOdaeTBcR OKpeMO) notpi6Hn yCTAHOBNIOLBaNHn aДaNTeP (npOdaeTBcR OKpeMO).ДетаNBHy iHΦOPMaIauZI qHTaTe B Noci6HNY 3 KOpNCTyBaHHY,ЯкDNODaEeTBcRdo YCTaHOBNIOLBaNHorO aДaNTePa.
-Якшо notpioho 3himatn nobHokkaipoboi 3o6paXeHHB, BkOpuctobyte 06'ekTbN dIra nobHOKaipoboro foopMaTy.
-ПереньocячфOTOanapat3O6'EKTNBOM,MiHOTPnMaIe iФOTOanapaT,i O6'EKTNB.
- He TrpmaTe Bupi6 3a ChactnHy o6'Ktmba, kky BuTARHyTO nla HaBJIuXeHHa 60 foKocyBaHH.
Bid'εηHannH o6'εKtmba
IpoDobKyuTe HaTnCKaT N KHOIpKCaTopa 06'kTbBa Ta NOBepTaHToEo6'kTbY HAnpMky CTpIKN Do ynpOy.
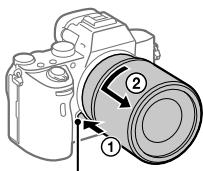
Khonka φikcaTopa 06'ekTnBa
UA
Cymichi 06'ekTbB
HnXue habeNo cymichi 3 nIM fOToaIapaTOM 6KtNB:
| 06'ЕКТИВ | Суmichiсть i3 φоюанapатом | |
| 06'ЕКТИВ 3A-пекхідніkom | 06'ЕКТИВ суmichi i3 повнокадрови форматом 35 мм | ✓ (ПOTriбен дοда时装ови установлівалын aдаптет (пpoдаэтся okрем), суmichi i3 повнокадрови Форматом) |
| 06'ЕКТИВ, призныаецни дlya poЗміру APS-C | ✓* (ПOTriбен дοда时装ови установлівалын aдаптет (пpoдаэтся okрем)) | |
| 06'ЕКТИВ 3E-пекхідніkom | 06'ЕКТИВ суmichi i3 повнокадрови форматом 35 мм | ✓ |
| 06'ЕКТИВ, призныаецни dlya poЗміру APS-C | ✓* | |
- 3öbpaexeHnna 6byt b3aɪncybaTmca i3 po3mpiPOM APS-C. KyT orIydu BⅣπoBIaTmme 6lb3bko 1,5 φκογκhoI BⅣcTaHI, Bkα3aHOHa o6'ekTNbI. (HapriKlnd, kAIO BCTaHOBJIeHO o6'ekTNb 50 MM, kyT orIydu 6ydeBⅣπoBIaTn 6'ekTNbY 75 MM.)
Kpok 5: HanaTbyBaHHa MOBt a roDHHNka
1 506 yBIMKHyTu foToanapat, BCTaHOBITb nepemnkay ON/OFF (XNBLeHHa) y noJoxeHHA «ON».
Ipezmkauch ON/OFF (KINBneHHa)
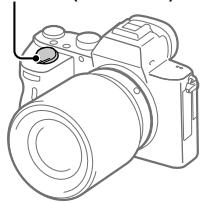
2 Bn6epitb notpi6Hy MOBy i HATNCiHtB nOcepeuHi dNcKa KepyBaHH.
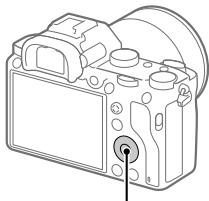
DnCKKepyBaHHa
3 Npebipte, uBn6paHo Ha ekpaH i NyHKT [Bxi], i HATNCiTB nOcepeHHi.
4 Bn6epitb notpi6he reorpaphiue po3TaUyBaHHa i HATNCiHt b nocepeniHi.
5 HaTnCHeHHM BepXhBOrO/HnXhBOrO KpaO ncka KepyBaHHa nn 1om o6ePahHn DaCKa KepyBaHHa Bn6epi b [DaTa/Yac], a ToDi HATnCHiTb NocepeDnHi.
6 Bn6epiB noptip6Hn nyHKT haTncHeHHM BepxHboro, HnKhboro, IIBORo a6o npaboro KpaO duCKa kepyBaHHa, a ToDi HATNCHTb nocepeHHI.
UA
7 3mHnIH HnHnHaawTyBaHH, NOBtOpitb KpOKn 5 i6, NotIM Bn6epitb [Bxid] i HATNCHTb NocpeDnHi.
Пидазka
-Дяс acybaHHB BCTaHOBJIeHH DaTи uacy BnKOpNCTOByTe MENU.
Ppimitka
- Koln 3o6pa9eHHN CΦokycOBaHo, 3acBiyEYbCBAH iHmKATop (Ak-OT).
5 Nobhicto HATNCHTb KHONky cncyk.
3iomka bideo
Lio6 po3noatn/3ynnnntn 3annc,HaTncihtb Khonky MOVIE.
BivTBOpenh3o6paXeHb
Iapametpn BiJeO3nOMKn
120p 60p 60i 30p 24p
100p 50p 50i 25p
YacToTa 3mHn BiDeokaPrib
100 60 50 25
13 1px
3aninc npokci
120fps 60fps 30fps 15fps 8fps
4fps
100fps 50fps 25fps 12fps 6fps
3fps 2fps 1fps
Yactota Ka,dpB IaIyIOMKn B yNobiJIbHeHOMy/NpIcKOpEHomy pexMni
APS-C/Super 35mm
3apJkaeTbcn cnaax
VIEW
Biodo6.haiau.BIMK

PiicbuiyBaHHA AF
Flicker
PomiuyeHo 6JIIMaHHa


BIMK./yIbIM.SteadyShot, nonepeJxehnH npToTpeMtinH nofoanapara


Фok. BiDCT. SteadyS./
PonepeJxehnH npTo TpeMtiHnH
foToanapata


PozymHe MaCtTa6yBaHnA/ MacsTt.izK.3o6p./LnΦpObe MaCtTa6yBaHHa
-PC-
Дистанци HekepyBaHn3 kOmI'IoTepa

KOHtp. RACKpaBOCTi

Be3Uym.3NOMka

IHpahepBOHnIyblT DnCTaHuiHO KepyBaHHN

Пд ус ВideОзOMKn 3ByK He 3aINcYETbcr

3mehu.uymy Bitpy

3aninc iHopmaui npo ABTOpcbki npaba
Assist Assist Assist S-Log2 S-Log3 HLG 709 HLG20
PiDTP.ДИСПЛ.Gamma

CkacyBaTNΦOKyc

Ckacyb.cIikkyuoyn AF
ToUKOBnΦOKyc
BukohHHyHKu[ToKOBnΦokyc]

AKTINBOBAHO NFC (28)

ПдклоченьBluetoothdoctynhe /ПдклочennyBluetoothнededoctynhe


PiiKIOUeHo Do CmapTfoHa/He PIIKIOUeHo Do CmapTfoHa


OtpmaHnHaIhOpMaui npoMICue3HaxoJxHeHH/ IHopmauio npo Micue3HaxoJxHeHH OTPmaTn HEMOXJIIBO

Pekm nolbOToY

PonepeJxKHeHn npo neperpibHHa

4 HanaaHTyBaHn3iOMKn
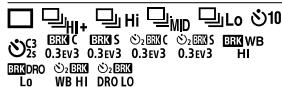
Pekm npotraHH

A

牛


100

EAR 8
Pekhmicnaiaxy/ Be3dpotob.cnaiax/M3meh.echpeb.0eey
±0.0
Kopeku. ekcn. cnan.
UA
AF-S AF-A AF-C DMF MF
PekumФokycbaH.

06n.fokycbHH
JPEG RAW RAW RAW+J RAW+J
ΦopMaT Φaɪnla

Pexim Bvmipy

7500K A5 G5
BaIaHc 6iIoro (aBtOMaTnUHe HanaWtBuHn, nonepedHbO BCTaHOblHe HanaWtBuHn, aBTOMaTnUHe NiD BOIOU, CneuiJIbHe HanaWtBuHn, KoiipHa TempepaTpya, KoiipHni (fJbTp)

OnTm3. D-diana3./ABTO HDR


TbOpH CTnIb/KoTHpaCTHiCTb, HAcuHeHcTb, YtKiCtB
EeKMaJIOHka

Пиор.обличьВ AF
PP1~PP10 PP OFF
Ppoijb3o6paXeH.

Ppiop.Hocir3anncy
5 IIndnkaTop oKocyBaHnHaHaTaTyBaHnEeKnO3nii

INДиKaTOpФokycBaHЯ
1/250
Bntpumka
F3.5
3haeHH iaqpaMn

Kopekjié ekcnozii/ EknohybaHnBpyuHy
ISO400 ISO AUTO
Uytinbictb ISO

Ekpan BiTbOpEnHnoDnOro 3o6paXeHHa
Biodo6paXeHn rictorpaMn
1 OchOBHa iHΦopMaúri
1 2
BiodtbopenH3 HociiB


XAVCS 4K
Pekm pepernyd

PeYtINr

3axnCT
DPOF
BCTaHOBJIeHO DPOF
3/7
HomepФaIy/KIbKicTb 3o6paKeHb ypeXmI nepeRny

AKTINBOBAHO NFC (28)

3aillkobni 3apd 6ataei (18)

Гуна 6e3nepepbHoi 3iOMKn

IodatKOBe BiJeO BkJIuOyeHO
* BkIIOHO i3 OndOuaCHO IO 3IOMKOIO DOaTkoBOrO BiJeO
Memory Stick
| Формат зйомки | Пдтугуна на karта пам'ятι | |
| Фотоградía | Memory Stick PRO Duo/ Memory Stick PRO-HG Duo | |
| AVCHD | Memory Stick PRO Duo (Mark 2)/ Memory Stick PRO-HG Duo | |
| XAVC S | 4K 60 M6iT/c* HD 50 M6iT/c a6o мениe* HD 60 M6iT/c | Memory Stick PRO-HG Duo |
| 4K 100 M6iT/c* HD 100 M6iT/c | — | |
* BkIIOHO i3 OndOuaCHO IO 3IOMKOIO DOaTkoBOrO BiJeO
Ppimitka
-KopriCTyTReTcB H3dOM 1 KOJI BVKOpNCTOBYETbCRA NIIe OJHa KaPta NaM'RTI UHS-II. TAKoX Bn6epiTB MENU (HanaSTyBaH.) [HanaST.3aInc.Hocia] → [Piop. Hocia 3anCiY] → [Ht3do1].
Kapty Memory Stick PRO Duo HEmoXJINBO BVKOpNCTOBByBaTu y rHi3Di 1.
Jauo Kapta na'maT SDHC BkOpncToBcytcbdI npBaIoi 3IOmKn bIeO XAVC S,3Hae BiOe npOinPcTa hA qainPiPo3MpIOM 4I6. PoinHei pAnMn OMOHa o6p6bIaN kOINH paIn, Jauo ix imnpTyBaTn Ha KOMn'IOTep 3a DOnomOrO IO nporpaMn PlayMemories Home.
Lio6 3aIncybaTn BiJeO h KaTn nam'rTi y rH3dx 1 Ta 2 3 HabeDeHMMn HanaIaHTyBaHnMn fOToanapata, BCTaBe TBI kaTn nam'rTi 3 OHaKoBOIO qaiNoBOIO CnCTeMoIO. BiJeO XAVC S He MoXHa 3aIncybaTn ODoHaoc Ho Ndi KaTn nam'rTi, OHa I3 kXnx Ma faiNoBry CnCTeMy exFAT, a IHsa - FAT32.
-[]ΦOpMaTpaaIa]Maε3HaueHnHa[XAVCS4K]a6o[XAVCSHD]
-[Pexim3aIncy]y MeHIO [HaIaIIT.3aInC.Hocia]Mae 3NaueHHra[Odnochn()]abo [Odnochn.()]
CtAndapt Bluetooth Bep. 4.1
YactOTHn dianaON:2,4T
AdaTep 3MinHoro Ctpymy AC-UUD12/AC-UUE12
HOMIHajbHI BXiDHI xapakTePnCTIKN: 100-240B 50/60 Fu,0.2A
HominHaBnBa BXiHa nOtaYxKHiCTb:5B=1,5A
AkymyIaTop NP-FZ100
HomiHaJIbHa HAnpyra:7,2B-
06'KTHB
FE 28-70 mm F3.5-5.6 OSS
(BXOINTb DO KOMNJIeKtY ILCE-7M3K)
Φokycha BiDCTaHb: 28 MM - 70 MM
Ipynn/elemEnTu 06'kTnBa:8-9
Kyt orny: 75^ - 34^
MihimBalna BiiDCTaNb BoKycyBaHnA*: 0.3 M -0.45 M
*MiHimAbHa BIDCTaHb FOKyCbAHnH 一He HaimeHla BIDCTaHb MIX DaTChKOM 3o6paXKeHH Ta O6'kOTOM.
MakcimalbHe 36iNbseHn:0,19x
MihimbaHa onHnuaIaIpaIparm: f/22-f/36
Diametp pfjIbIpa:55 MM
Pozimpi (Mak. dIaMeTp x Bicota): np6bn.72,5 MM x 83 MM
Maca: npn6nl.295 r
GNU General Public License
(aJIy TeKci-《GPL》)a6o
GNU Lesser General Public License
(ДалиуTekti-«LGPL»).
LcO3Haaε,io 3a yMOBaAMn
JIueh3iGPL/LGPL,akiDdaIOTbcra
KopncTyBaH Mae npaBO Ha DoCTyn,
3MiHn i IIOdaJIbIe PO3IOBcOJXeHHa
BnxiDHoro KoDy Lnx nporpaM.
BuxiHn KODIOCTynn B IHTepHeti.
Uo6Ioro3aBaHTaXuNTn,
ckopnctaaTece TaKIOU URL-aDpecoI:
http://oss.sony.net/Products/Linux/
IpoCIMo KOpNCtYBauiB He
3BepTaTncaIIOHACCTOCOBHO BMICTY
BuxiHOrO KoNy.
TeKCTnJIiueH3i(aHrliBckkoIO
MOBOIO) 36epexKeHO y BHyTpiiHHi
nam'anti Bnpo6y. 06 03HaHOMtncs
Installation of PlayMemories Mobile
PlayMemories Mobile er nödvendig for at kinne tilslutte kameraet til en smartphone. Hvis PlayMemories Mobile allerede er installerer på din smartphone, skal du sorge for at opdatere den til den seneste version. For detailer om PlayMemories Mobile skal du se supportsiden (http://www.sony.net/pmm/).

PlayMemories Mobile

DK